Cocoa绘图技术
绘图上下文
绘图上下文是一个抽象的概念,它代表着当前绘图的虚拟设备(屏幕,PDF文件,打印机),绘图的各种视觉属性设置(颜色,线宽,风格等等),以及采用的坐标系统,因此可以简单的理解为绘图上下文 = 目标设备 + 视觉设置 + 坐标系统。
在应用系统中绘图上下文跟视图对象密切相关,每个视图都有自己的绘图上下文对象,在视图的UI更新周期内都会执行视图绘制操作,也就是调用视图对象的drawRect:方法,在drawRect方法内部可以对当前绘图上下文进行各种属性和参数的设置。
每个NSWindow窗口的的绘图上下文是独立不相关的,在当前窗口中对绘图上下文的各种设置修改都不会影响到其他窗口的绘图上下文。同一窗口内的所有子视图默认都使用同一个父窗口的绘图上下文。
坐标系统
笛卡尔坐标
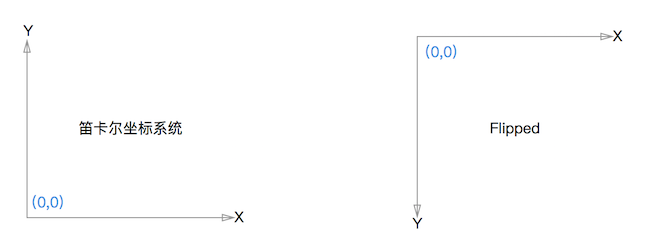
每个视图在屏幕上的位置用使用坐标来定义,坐标系统一般采用的是笛卡尔坐标系统,即顶点原点(0,0)在左下角位置。
笛卡尔坐标系统有些场景使用不是很方便,这时候我们可以对它进行转换,将坐标原点移动到左上角,这个变换称之为Flipped化。
对视图对象实现isFlipped方法返回YES,即表示使用Flipped化的坐标系统。
-(BOOL)isFlipped {
    return YES;
}
屏幕坐标与本地坐标
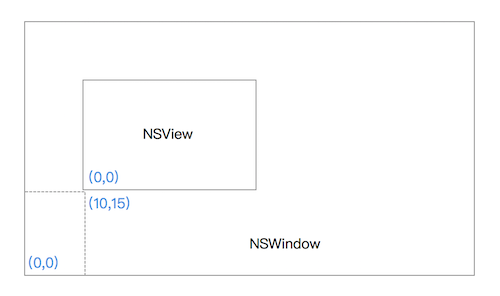
屏幕上每个点的坐标我们称为屏幕坐标,为了方便起见每个视图都是采用本地坐标系统,即左下角(0,0)为原点做为参考点来进行内部绘图设计。只有需要绘制到屏幕上时才将视图内部本地坐标转换为屏幕的坐标来显示。
以下图为例,视图NSView坐标原点的本地坐标为(0,0),它的内部图形绘制都基于本地坐标计算,绘制到屏幕上时系统自动转换NSView坐标原点为屏幕坐标(10,15),其他点的坐标也做统一转换。
坐标变换
变换Translation是一种针对坐标的数学运算操作,分为3类:
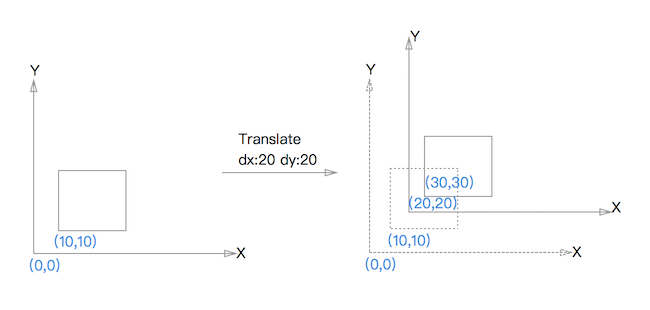
1)平移变换:对当前坐标系统的原点origin在垂直或水平方向移动一定距离。
代码中使用NSAffineTransform的translateXBy:yBy: 进行位置平移。
NSAffineTransform* xform = [NSAffineTransform transform];
[xform translateXBy:20.0 yBy:20.0];
[xform concat];
对坐标系进行x和y轴分别进行20个像素的移动后,原点在(10,10)位置的的图形,在原坐标系中相当于移动到了(30,30)的位置。
2)缩放变换
对坐标系中的点按比例缩放,可以分别针对x轴或y轴进行拉大或缩小,比例系数大于1表示放大,小于1表示缩小,比例系数为1表示没有缩放。
下面的代码表示分别对坐标系中图形的点坐标沿x轴和y轴进行2倍拉伸,拿一个正方形例子来说的话,最直观的就是视觉上感觉边长放大了2倍。
NSAffineTransform* xform = [NSAffineTransform transform];
[xform scaleXBy:2.0 yBy:2.0];
[xform concat];
3)旋转变换
将坐标系沿原点旋转一定的角度
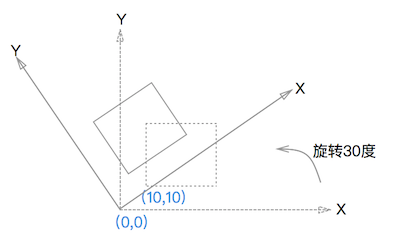
NSAffineTransform* xform = [NSAffineTransform transform];
[xform rotateByDegrees:30];
[xform concat];
变换的数学公式
三种变换方式统一的使用数学上的矩阵运算表示如下
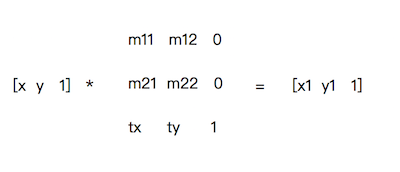
其中[x y 1] 表示原坐标,[x1 y1 1]为变换后的坐标
用数学表达式表示如下:
x1 = m11*x + m12*y + tx
y1 = m21*y + m22*y + ty
m11,m21为缩放系数,m12,m22为旋转系数,tx,ty为平移系数
对于单独的每一种变换,相当于其他的变换系数为固定的1或0,比如平移变换相当于缩放系数为1,旋转系数都为0。
变换数学表达式中是乘法和加法的混合运算,因此不支持2种不同的变换之间交换顺序。也就是说先旋转后缩放和先缩放后旋转的效果不是等价的。
变换操作编程
所有图形相关的操作都需要在视图的drawRect:方法内部来实现。
变换操作编程基本流程: 1)获取变换操作类 2)定义变换类型和参数 3) 应用变换
- (void)drawRect:(NSRect)dirtyRect {
    [super drawRect:dirtyRect];
    //获取变换操作类
    NSAffineTransform* xform = [NSAffineTransform transform];

    //定义变换
    [xform translateXBy:10.0 yBy:10.0];
    [xform rotateByDegrees:60.0];
    [xform scaleXBy:2.0 yBy:2.0];

    //应用变换
    [xform concat];

}
变换撤销/还原:如果应用了变换操作,则当前绘图上下文中后续所有的绘图相关操作都会受到影响。如果希望变换只影响部分的绘制,可以在需要变换的代码执行完成后,使用invert来撤销变换操作,后续的绘图就不在受变换的影响。
.....

//执行反向操作
[xform invert];
//应用变换
[xform concat];
点与像素
点(point)是用户空间或者开发者角度的点,可以理解为一个逻辑点,而像素(Pixel)为设备空间(屏幕 打印机 PDF)的一个真实的点,可以理解为一个物理点。点是设备无关的是个逻辑概念,而像素是跟物理设备相关的。
dpi是英文dot per inch的缩写,表示每英寸的像素数。72 dpi 表示每英寸有72个像素,每个像素的宽度是1/72 英寸。
如果用户空间的点(point)和设备空间的像素(Pixel) 一一对应,我们可以认为用户空间跟设备空间是1:1 对应的,这种情况下可以认为点(point)的宽度是1/72。
1个inch 在低分辨率下对应7272个像素点,因此7272的图片正好能显示在1英寸(约2.54cm)的矩型区域内。
![]()
可以认为用户空间的分辨率永远是72dpi,而当提高设备分辨率为 144dpi 时,144dpi 高分辨率下每个像素的宽度为1/144英寸,即每个像素大小变小。此时认为一个用户空间的点对应设备空间的2个像素。
![]()
下面是几种iPhone设备的的分辨率,由于用户空间跟设备空间分辨率存在比例关系,因此对于图片资源必须提供原尺寸2x,3x倍的大小不同规格去适配不同的手机来保证屏幕上的显示效果。如果提供的尺寸不满足就会被系统进行缩放处理,影响显示效果。(举个例子,如果图片名为m.png,系统根据不同的手机自动搜索m@2x.png 或m@3x.png的图片去显示。)

颜色与透明度
颜色定义了丰富多彩的图形世界,而透明度代表了光照的强度。
颜色模型和颜色空间
颜色模型定义了通过哪些维度/参数来描述颜色,颜色空间是通过颜色模型定义的所有颜色的集合。
Cocoa中支持RGB、CMYK、HSB、Gray 四种颜色模型。
RGB模型是一种发光体的色彩模式,主要用在电子显示设备上,因此在黑暗中仍然可以看见RGB设备显示的颜色。
CMYK模型是由青色(Cyan)、洋红色(Megenta)、黄色(Yellow)和黑色四种基本颜色组合成不同色彩的一种颜色模式。它是一种依靠反光的色彩模式,主要用在印刷界传统的纸媒出版,比如说报纸的文字在黑暗中是看不见的,只能在有光线的场所阅读。
HSB模型包括色泽(Hue)、饱和度(Saturation)、亮度(Brightness) 3个维度,它是一种基于人的心理感觉的颜色模式。
Gray灰度模型代表了白色,黑色以及黑白之间所有的过渡色,黑白电视使用了灰度模式颜色空间。
LAB模型是人眼看见的色彩模式,L通道只表示明亮,不代表色值;A通道代表从洋红色至绿色的范围;B表示从黄色至蓝色的范围。
不同的设备实现或材质上的差异,因此颜色的视觉显示上是跟设备是相关的,同一个颜色在不同设备上显示效果是有差异的;而LAB模型中的颜色是从人类的视觉感官的定义的,因此LAB颜色空间是跟设备无关的。
创建颜色
Cocoa中使用NSColor来定义和创建颜色,NSColor提供了多种方法用于在不同颜色模型中创建颜色。
创建设备无关的颜色的方法
//Gray
+(NSColor *)colorWithCalibratedWhite:(CGFloat)white alpha:(CGFloat)alpha;

//HSB
+(NSColor *)colorWithCalibratedHue:(CGFloat)hue saturation:(CGFloat)saturation brightness:(CGFloat)brightness alpha:(CGFloat)alpha;

//RGB
+(NSColor *)colorWithCalibratedRed:(CGFloat)red green:(CGFloat)green blue:(CGFloat)blue alpha:(CGFloat)alpha;
创建设备相关颜色的方法
//Gray
+(NSColor *)colorWithDeviceWhite:(CGFloat)white alpha:(CGFloat)alpha;

//HSB
+(NSColor *)colorWithDeviceHue:(CGFloat)hue saturation:(CGFloat)saturation brightness:(CGFloat)brightness alpha:(CGFloat)alpha;

//RGB
+(NSColor *)colorWithDeviceRed:(CGFloat)red green:(CGFloat)green blue:(CGFloat)blue alpha:(CGFloat)alpha;

//CMYK
+(NSColor *)colorWithDeviceCyan:(CGFloat)cyan magenta:(CGFloat)magenta yellow:(CGFloat)yellow black:(CGFloat)black alpha:(CGFloat)alpha;
颜色创建和不同空间转换的示例:将RGB颜色转换为CMYK和Gray颜色
NSColor* rgbColor = [NSColor colorWithCalibratedRed:1.0 green: 0.5  blue: 0.5
                                              alpha:1];
NSColor* cmykColor = [rgbColor colorUsingColorSpace:[NSColorSpace
                                                     genericCMYKColorSpace]];

NSColor* grayColor = [rgbColor colorUsingColorSpace:[NSColorSpace
                                                     genericGrayColorSpace]];
在绘图上下文使用颜色
NSColor类提供了设置绘图时填充和边框的颜色方法。
-(void)set;//同时设置填充色和描边边框的颜色
-(void)setFill;//设置填充色
-(void)setStroke;//设置描边边框的颜色
下面是设置边框颜色和填充色的代码
[[NSColor redColor] setStroke];
[[NSColor controlBackgroundColor] setFill];
而对于文本绘制时颜色的设置需要使用使用NSForegroundColorAttributeName属性去设置,在后续的文本章节另有说明。
绘图状态
绘图上下文中保存了各种属性设置,包括变换矩阵、裁剪区、线的各种属性、颜色、字体、阴影等信息。
使用saveGraphicsState保持绘图状态,完成绘图后使用restoreGraphicsState恢复。saveGraphicsState和restoreGraphicsState必须一一对应成对出现。
//保持绘图状态
[NSGraphicsContext saveGraphicsState];

//设置新绘图属性

//绘图操作

//恢复绘制状态
[NSGraphicsContext restoreGraphicsState];
在前面使用变换操作中章节我们提到的可以使用反向操作invert方法进行还原,由于invert是数学浮点数矩阵运算,本身可能有精度损失。因此我们更推荐使用绘图状态保存方法去恢复绘图状态。
从系统颜色面板获取颜色
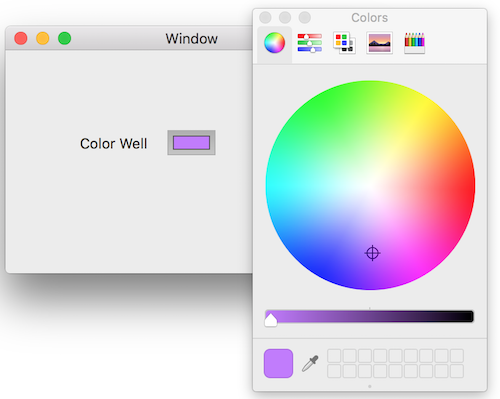
1.使用NSColorWell方式
从控件工具箱拖Color Well 控件到window界面,将控件的Sent Actions 事件绑定到colorAction:方法
- (IBAction)colorAction:(id)sender {
    NSColorWell *well = sender;
    NSLog(@"well color %@ ",well.color);
}
运行应用 点击Color Well,会弹出颜色面板,点击颜色面板后,Color Well的填充色跟跟着变化。同时可以从NSColorWell的color属性获取当前选择的颜色。
2.使用NSColorPanel方式
NSColorPanel比NSColorWell方式更灵活一些,可以将颜色的选择绑定到其它的控件的事件中。
NSColorPanel是一个全局单例类。调用前需要设置它的target和action,在action方法中可以获取NSColorPanel选择后的color属性。
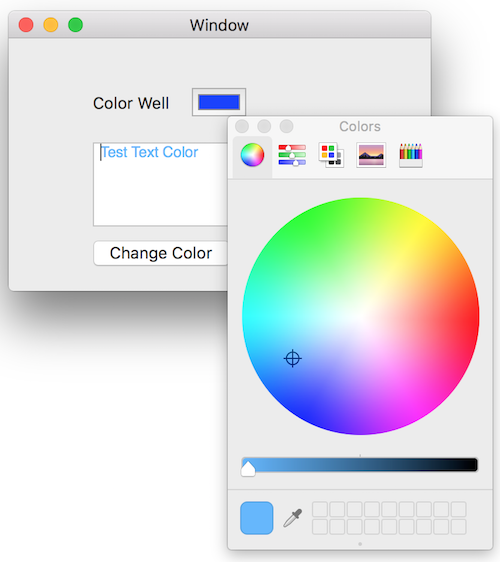
从控件工具箱拖一个TextView控件和一个Button按钮到window界面,修改Button的title为Change Color,同时绑定按钮的的Sent Actions 事件绑定到changeColorButtonAction:方法。
- (IBAction)changeColorButtonAction:(id)sender {
    NSColorPanel *panel = [NSColorPanel sharedColorPanel];
    [panel setTarget:self];
    [panel setAction:@selector(colorSelect:)];
    [panel orderFront:self];
}

- (IBAction)colorSelect:(id)sender {
    NSColorPanel *panel = sender;
    NSLog(@"colorSelect color %@ ",panel.color);
    self.textView.textColor = panel.color;
}
图像Image
NSImage是图象的核心类,主要提供下面的功能:
- 从文件加载图片资源
- 绘制渲染图片到屏幕
- 图片缩放
- 图片不同格式转换
NSImage对外提供了图象处理的高级接口,内部主要是通过操作NSImageRep类来完成各种处理操作的。NSImageRep对象代表了图象的颜色空间,图片的大小,图片对应的格式及其Data数据。一个NSImage对象可能包括多个NSImageRep对象,比如在TIFF格式的图片中有2个NSImageRep:一个代表原始图,一个代表缩略图。
图象内部缓存
每次图片被渲染到屏幕上时候,需要对图象数据做一些预处理,。当图片需要多次加载使用时,将预处理的数据缓存能提高性能。Cocoa对每个NSImage图象会做缓存,也可以调用NSImage的setCacheMode:方法来设置缓存策略来禁止缓存。
如果修改了图片的内容,需要调用recache方法来刷新缓存保证能显示最新的图片。
图象大小
图象的大小一般从NSImageRep 或者从Data数据字段中获取。如果图象的大小与渲染显示的区域一致,则正常显示。如果图象尺寸小于显示区域,对于支持缩放的矢量图,渲染显示没有什么问题; 而其它格式的图象则需要对使用插值算法生成更多的图象点数据来显示。
图象的坐标系统
图象的坐标系统跟绘制图象的父视图无关,图象的坐标系统仅仅影响图象本身的数据的绘制方向,默认情况下图象坐标系统是unflipped的。
在创建了一个新图象后,在设置lockFocus之前修改flipped属性,会影响后续的绘图中的坐标的方向;而在lockFocus之后修改flipped不会影响后续的绘图操作。
图象绘制方法
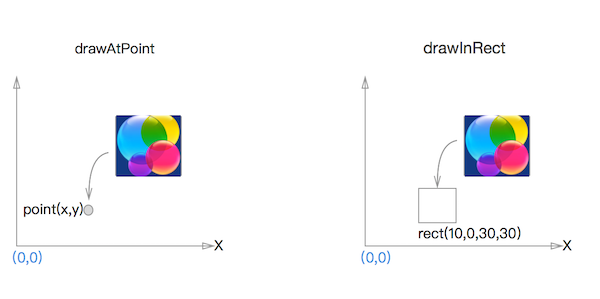
drawAtPoint方法是将图象按原大小绘制到指定的point位置,operation参数定义了图象的合成模式,fraction定义透明度,范围是0.0到1.0。
drawInRect方法是裁剪式绘制,可以将图象看成是一个(0,0,width,height)的矩形。第一个参数rect为绘制时目标区域,fromRect定义了图象的裁剪区域,裁剪可以跟图象矩形完全一致,也可以是其中一部分。rect跟fromRect大小不一致时,会进行缩放的处理。
-(void)drawAtPoint:(NSPoint)point fromRect:(NSRect)fromRect operation:(NSCompositingOperation)op fraction:(CGFloat)delta;

-(void)drawInRect:(NSRect)rect fromRect:(NSRect)fromRect operation:(NSCompositingOperation)op fraction:(CGFloat)delta;
图象创建或加载
加载图象
1.从文件加载
NSString* imageName = [[NSBundle mainBundle]
                    pathForResource:@"image" ofType:@"png"];
NSImage* image = [[NSImage alloc] initWithContentsOfFile:imageName];
2.从文件名加载
优先依次从下面目录加载指定的文件
1)AppKit.framework的Resources目录
2)App 的Resources目录中的图片
NSImage *image = [NSImage imageNamed:@"image"];
绘制图象
除了从文件加载图片外,也可以创建图象,在图象的context上下文中绘制内容。绘制前必须先调用lockFocus方法,完成后执行unlockFocus方法。
NSImage *canvas = [[NSImage alloc] initWithSize:rect.size];
[canvas setFlipped:YES];
[canvas lockFocus];
NSRectFill(rect);
[NSBezierPath strokeRect:rect];
[canvas unlockFocus];

[canvas drawAtPoint:NSMakePoint(0.0, 0.0)  fromRect: NSMakeRect(0.0, 0.0, 100.0, 100.0)
          operation: NSCompositeSourceOver
           fraction: 1.0];
OS X 10.8版本及以后,使用imageWithSize:flipped:drawingHandler: 方法代替unlockFocus的方式来绘制图象确保对高分辨率更好的支持。
NSImage *image =  [NSImage imageWithSize:NSMakeSize(40, 40) flipped:NO drawingHandler:^(NSRect rect) {

    [[NSColor redColor]setFill];

    NSRectFill(rect);

    return YES;
}];

[image drawAtPoint:NSMakePoint(10.0, 10.0)  fromRect: NSMakeRect(0.0, 0.0, 40, 40)
         operation: NSCompositeSourceIn
          fraction: 0.5];
屏幕图象捕获
在视图类中增加一个saveImage方法,基本流程如下:
- 获取视图显示缓存区中的image对象
- image对象转化为Bitmap
- 从Bitmap获取图象Data数据
- 写入文件
- (void)saveImage {
    //视图的image
    NSImage *viewImage = [[NSImage alloc] initWithData:[self dataWithPDFInsideRect:[self bounds]]];

    //获取ImageRep
    NSBitmapImageRep *imageRep = [NSBitmapImageRep imageRepWithData:[viewImage TIFFRepresentation]];

    //图象压缩比设置
    NSDictionary *imageProps = [NSDictionary dictionaryWithObject:[NSNumber numberWithFloat:1.0] forKey:NSImageCompressionFactor];

    //Data数据
    NSData *imageData = [imageRep representationUsingType:NSJPEGFileType properties:imageProps];

    //文件路径
    NSString *filePath = [NSString stringWithFormat:@"/Users/my/Documents/file%d.png",22];

    //写入文件
    [imageData writeToFile:filePath atomically:NO];
}
图象格式转换
NSImage支持多种类型的格式转化,需要先将NSImage转化为NSBitmapImageRep类型,再指定转化的类型得到NSData,然后写入文件即可。
typedef NS_ENUM(NSUInteger, NSBitmapImageFileType) {
    NSTIFFFileType,
    NSBMPFileType,
    NSGIFFileType,
    NSJPEGFileType,
    NSPNGFileType,
    NSJPEG2000FileType
};
下面是图象格式转换的示例代码
NSImage *image = [NSImage imageNamed:@"image"];
NSBitmapImageRep *imageRep = [NSBitmapImageRep imageRepWithData:[image TIFFRepresentation]];
NSDictionary *imageProps = [NSDictionary dictionaryWithObject:[NSNumber numberWithFloat:1.0] forKey:NSImageCompressionFactor];
NSData *imageData = [imageRep representationUsingType:NSJPEGFileType properties:imageProps];
阴影和渐变
阴影
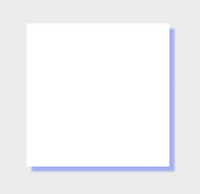
阴影属性定义了它出现的位置offset,阴影的半径和阴影颜色
阴影设置会修改绘图上下文的状态,因此需要保存和恢复上下文的状态。这样不会对后续其它绘图操作造成影响。
[NSGraphicsContext saveGraphicsState];

NSShadow* theShadow = [[NSShadow alloc] init];
[theShadow setShadowOffset:NSMakeSize(5.0, -5.0)];
[theShadow setShadowBlurRadius:2.0];
[theShadow setShadowColor:[[NSColor blueColor]
                            colorWithAlphaComponent:0.3]];
[theShadow set];

[NSBezierPath fillRect:aRect];

[NSGraphicsContext restoreGraphicsState];
渐变
渐变需要定义一组颜色,每组至少需要2种颜色。每种颜色指定location参数,范围为0.0~1.0 之间。
线性渐变
线性渐变是颜色沿着水平,垂直或者指定其他角度的一个轴,指定颜色按顺序改变,提供三种方法来实现线性渐变绘制
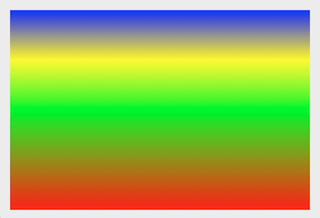
1.以指定的Path为裁剪区域,angle为渐变轴的方向
-(void)drawInBezierPath:(NSBezierPath *)path angle:(CGFloat)angle;
- (void)drawRect:(NSRect)rect {
    NSRect        bounds = [self bounds];
    NSBezierPath*    clipShape = [NSBezierPath bezierPath];
    [clipShape appendBezierPathWithRect:bounds];
    NSGradient* aGradient = [[NSGradient alloc]
                              initWithColorsAndLocations:[NSColor redColor], (CGFloat)0.0,
                              [NSColor greenColor], (CGFloat)0.5,
                              [NSColor yellowColor], (CGFloat)0.75,
                              [NSColor blueColor], (CGFloat)1.0,
                              nil];
    [aGradient drawInBezierPath:clipShape angle:90];
}
2.在当前绘图上下文中,指定起点终点和options参数绘制
-(void)drawFromPoint:(NSPoint)startingPoint toPoint:(NSPoint)endingPoint options:(NSGradientDrawingOptions)options;
- (void)drawRect:(NSRect)rect {

    NSPoint centerPoint = NSMakePoint(0, 0);
    NSPoint otherPoint = NSMakePoint(0, 60);

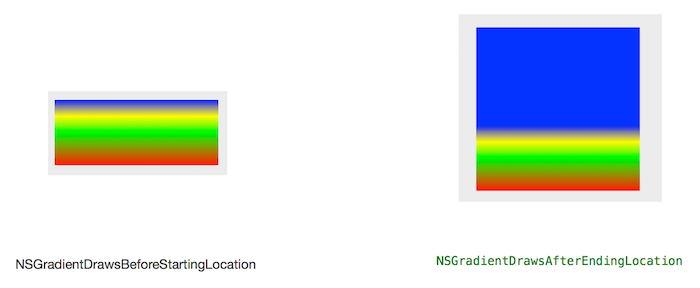
    [aGradient drawFromPoint:centerPoint toPoint:otherPoint options:NSGradientDrawsBeforeStartingLocation];

}
不同的options的绘制效果如下,可以看到NSGradientDrawsBeforeStartingLocation参数对原矩形区域做了裁剪。
3.以rect参数为裁剪区域绘制渐变
-(void)drawInRect:(NSRect)rect angle:(CGFloat)angle;
- (void)drawRect:(NSRect)rect {

    NSGradient* aGradient = [[NSGradient alloc]
                              initWithColorsAndLocations:[NSColor redColor], (CGFloat)0.0,
                              [NSColor greenColor], (CGFloat)0.5,
                              [NSColor yellowColor], (CGFloat)0.75,
                              [NSColor blueColor], (CGFloat)1.0,
                              nil];

    NSRect aRect = NSMakeRect(10, 10, 40, 40);

    [aGradient drawInRect:aRect angle:90];

}
径向渐变
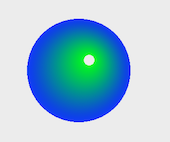
径向渐变是颜色沿着圆形从起点到终点进行变换,提供三种方法来实现径向渐变绘制
1.指定起点终点位置和半径
-(void)drawFromCenter:(NSPoint)startCenter radius:(CGFloat)startRadius toCenter:(NSPoint)endCenter radius:(CGFloat)endRadius options:(NSGradientDrawingOptions)options
- (void)drawRect:(NSRect)rect {
    NSRect bounds = [self bounds];
    NSGradient* aGradient = [[NSGradient alloc]
                              initWithStartingColor:[NSColor blueColor] endingColor:[NSColor greenColor]];
    NSPoint centerPoint = NSMakePoint(NSMidX(bounds), NSMidY(bounds));
    NSPoint otherPoint = NSMakePoint(centerPoint.x + 10.0, centerPoint.y +10.0);
    [aGradient drawFromCenter:centerPoint radius:50
                     toCenter:otherPoint radius:5.0
                      options:0];
}
2.在当前上下文中指定rect绘制矩形,渐变的起点位置以relativeCenterPosition决定
-(void)drawInRect:(NSRect)rect relativeCenterPosition:(NSPoint)relativeCenterPosition;
(-1.0, -1.0):左下角
(1.0, -1.0):右下角
(1.0, 1.0) :右上角
(-1.0, 1.0):左上角
(0.0, 0.0):中心点
 - (void)drawRect:(NSRect)rect {
    NSGradient* aGradient = [[NSGradient alloc]
                              initWithColorsAndLocations:[NSColor redColor], (CGFloat)0.0,
                              [NSColor greenColor], (CGFloat)0.5,
                              [NSColor yellowColor], (CGFloat)0.75,
                              [NSColor blueColor], (CGFloat)1.0,
                              nil];

    NSPoint startPoint = NSMakePoint(1, -1);
    [aGradient drawInRect:rect relativeCenterPosition :startPoint];

}
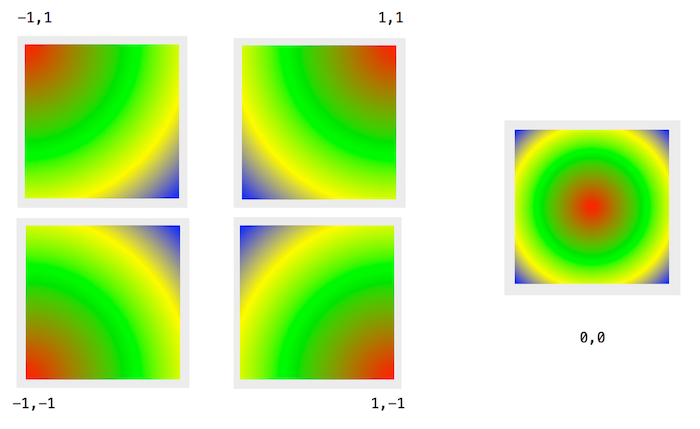
3.绘制指定的path,渐变的起点位置以relativeCenterPosition决定
-(void)drawInBezierPath:(NSBezierPath *)path relativeCenterPosition:(NSPoint)relativeCenterPosition;
- (void)drawRect:(NSRect)rect {
    NSRect        bounds = [self bounds];
    NSBezierPath*    clipShape = [NSBezierPath bezierPath];
    [clipShape appendBezierPathWithRect:bounds];
    NSGradient* aGradient = [[NSGradient alloc]
                              initWithColorsAndLocations:[NSColor redColor], (CGFloat)0.0,
                              [NSColor greenColor], (CGFloat)0.5,
                              [NSColor yellowColor], (CGFloat)0.75,
                              [NSColor blueColor], (CGFloat)1.0,
                              nil];
    NSPoint centerPoint = NSMakePoint(1, -1);
    [aGradient drawInBezierPath:clipShape relativeCenterPosition :centerPoint];

}
文本Text
这里仅简单介绍文本基本属性设置,文本的绘制方法和代码示例。更复杂的文本排版绘制请参考Core Text相关文档。
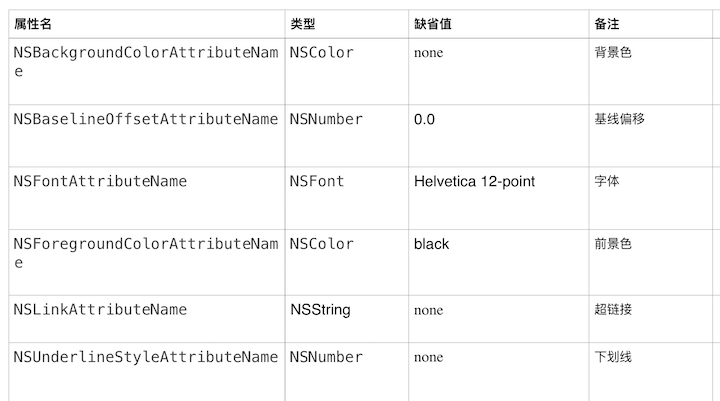
文本属性参数
下面列出了常用的文本属性参数,更多的属性请参阅 Attributed String Programming Guide 文档。
String类扩展的文本绘图方法
@interface NSString(NSStringDrawing)
//根据文本属性获取size
-(NSSize)sizeWithAttributes:(NSDictionary *)attrs ;

//在指定点point绘制属性文本
-(void)drawAtPoint:(NSPoint)point withAttributes:(NSDictionary *)attrs ;

//在指定矩形内绘制属性文本
-(void)drawInRect:(NSRect)rect withAttributes:(NSDictionary *)attrs ;
@end

@interface NSAttributedString(NSStringDrawing)
//返回属性文本的size
-(NSSize)size;

//在指定点point绘制
-(void)drawAtPoint:(NSPoint)point ;

//在指定矩形内绘制
-(void)drawInRect:(NSRect)rect ;
@end
String 绘制编程
通过设置文本的各种属性参数
NSString的样式属性是整体性的配置,不能对string中的子串进行局部设置单独的样式。
NSString *str = @"RoundedRect";

NSFont *font = [NSFont fontWithName:@"Palatino-Roman" size:14.0];
NSColor *strColor = [NSColor greenColor];
NSMutableDictionary *attrsDictionary = [NSMutableDictionary dictionary];

attrsDictionary[NSFontAttributeName] = font;
attrsDictionary[NSForegroundColorAttributeName] = strColor;

NSPoint p = CGPointMake(0, 0);
[str drawAtPoint:p withAttributes:attrsDictionary];
NSMutableAttributedString可以灵活的定义文本的样式,通过NSRange指定不同的范围来实现字串个性化配置。
NSPoint p = CGPointMake(0, 10);
NSRange selectedRange = NSMakeRange(0, string.length);

NSMutableAttributedString *string = [[NSMutableAttributedString alloc]initWithString:@"NSMutableAttributedString"];

NSURL *linkURL = [NSURL URLWithString:@"http://www.youtube.com/"];

[string addAttribute:NSLinkAttributeName
               value:linkURL
               range:selectedRange];

[string addAttribute:NSForegroundColorAttributeName
               value:[NSColor blueColor]
               range:selectedRange];

[string addAttribute:NSFontAttributeName
               value:font
               range:selectedRange];

[string addAttribute:NSUnderlineStyleAttributeName
               value:[NSNumber numberWithInt:NSUnderlineStyleSingle]
               range:selectedRange];

[string drawAtPoint:p];
路径Path
路径Path用来定义一组点的集合,使用这些点可以绘制基本的图形(直线,弧形,曲线),复杂的图形(矩形,圆,椭圆,多边形) 甚至更复杂一些不规则的图形。
Cocoa中提供了唯一的NSBezierPath类来创建管理和操作Path对象,同时也提供了许多高级系统函数来方便的创建基本的几何图形。
定义一个几何图形使用点(NSPoint)、矩形(NSRect)、大小(NSSize)数据结构去描述它。例如对于直线使用起点和终点2点就可以唯一确定。矩形图象使用NSRect定义。圆使用中心点和半径来定义。
用Path绘图的基本过程:
- 规定起点
- 设置绘图属性(也可以使用默认属性)
- 定义Path
- 设置Path属性
- 完成绘制
Path的属性
1.线宽:默认绘图线条的宽度为1,可以修改全局的线宽或者针对特定的Path设置线宽
//全局的线宽
[NSBezierPath setDefaultLineWidth:2.0];

//特定的Path设置线宽
NSBezierPath* thePath = [NSBezierPath bezierPath];
[thePath setLineWidth:3.0];
2.线条端点样式
可以全局设置或局部针对每个Path设置
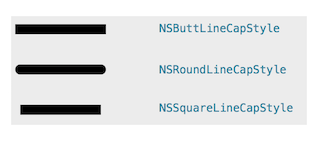
NSBezierPath* aPath1 = [NSBezierPath bezierPath];
[aPath1 setLineWidth:10.0];
[aPath1 moveToPoint:NSMakePoint(12.0, 20.0)];
[aPath1 lineToPoint:NSMakePoint(92.0, 20.0)];
[aPath1 setLineCapStyle:NSButtLineCapStyle];
[aPath1 stroke];

NSBezierPath* aPath2 = [NSBezierPath bezierPath];
[aPath2 setLineWidth:10.0];
[aPath2 moveToPoint:NSMakePoint(12.0, 60.0)];
[aPath2 lineToPoint:NSMakePoint(92.0, 60.0)];
[aPath2 setLineCapStyle:NSRoundLineCapStyle];
[aPath2 stroke];

NSBezierPath* aPath3 = [NSBezierPath bezierPath];
[aPath3 setLineWidth:10.0];
[aPath3 moveToPoint:NSMakePoint(12.0, 100.0)];
[aPath3 lineToPoint:NSMakePoint(92.0, 100.0)];
[aPath3 setLineCapStyle:NSSquareLineCapStyle];
[aPath3 stroke];
3.连接线样式
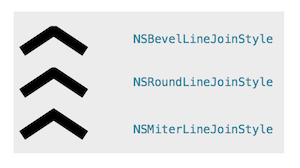
NSBezierPath* aPath1 = [NSBezierPath bezierPath];
[aPath1 setLineWidth:10.0];
[aPath1 moveToPoint:NSMakePoint(12.0, 20.0)];
[aPath1 lineToPoint:NSMakePoint(42.0, 40.0)];
[aPath1 lineToPoint:NSMakePoint(72.0, 20.0)];
[aPath1 setLineJoinStyle:NSMiterLineJoinStyle];
[aPath1 stroke];

NSBezierPath* aPath2 = [NSBezierPath bezierPath];
[aPath2 setLineWidth:10.0];
[aPath2 moveToPoint:NSMakePoint(12.0, 60.0)];
[aPath2 lineToPoint:NSMakePoint(42.0, 80.0)];
[aPath2 lineToPoint:NSMakePoint(72.0, 60.0)];
[aPath2 setLineJoinStyle:NSRoundLineJoinStyle];
[aPath2 stroke];

NSBezierPath* aPath3 = [NSBezierPath bezierPath];
[aPath3 setLineWidth:10.0];
[aPath3 moveToPoint:NSMakePoint(12.0, 100.0)];
[aPath3 lineToPoint:NSMakePoint(42.0, 120.0)];
[aPath3 lineToPoint:NSMakePoint(72.0, 100.0)];
[aPath3 setLineJoinStyle:NSBevelLineJoinStyle];
[aPath3 stroke];
4.Dash样式
Dash样式定义虚线模式,可以把直线理解为一个连续的点模式,每个点之间没有间隙。Dash模式定义了点和间隙的交替模式,并且多个模式可组合为一个模式。
Dash定义不支持全局设置,只能对每个Path单独设置
dash:2 gap:2 ------实线宽度为2个点,虚线宽度为2个点
dash:2 gap:2 dash:4 gap:4 ----实线宽度为2个点,虚线宽度为2个点,实线宽度为4个点,虚线宽度为4个点

NSBezierPath* aPath1 = [NSBezierPath bezierPath];
[aPath1 moveToPoint:NSMakePoint(12.0, 60.0)];
[aPath1 lineToPoint:NSMakePoint(192.0, 60.0)];

CGFloat lineDash[2];
lineDash[0] = 2.0;
lineDash[1] = 2.0;
[aPath1 setLineDash:lineDash count:2 phase:0.0];

[aPath1 stroke];

NSBezierPath* aPath2 = [NSBezierPath bezierPath];
[aPath2 moveToPoint:NSMakePoint(12.0, 20.0)];
[aPath2 lineToPoint:NSMakePoint(192.0, 20.0)];

CGFloat lineDash2[4];
lineDash2[0] = 2.0;
lineDash2[1] = 2.0;
lineDash2[2] = 4.0;
lineDash2[3] = 4.0;
[aPath2 setLineDash:lineDash2 count:4 phase:0.0];

[aPath2 stroke];
5.曲线平滑度Flatness
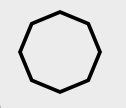
Flatness影响曲线线条平滑度,缺省值为0.6。值越小曲线越平滑,值越大曲线看起来就像多个短的直线段拼接起来。
[NSBezierPath setDefaultFlatness:20.0];
设置Flatness参数后影响后续绘制的曲线表面的平滑度。例如椭圆就会变成下面的样子
6.Miter Limits
斜角限制规则:如果线的宽度超过miter Limits,则使用连接线样式NSBevelLineJoinStyle来处理。
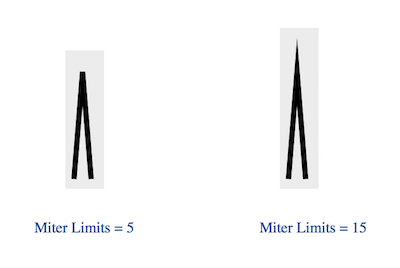
NSBezierPath* aPath = [NSBezierPath bezierPath];
[aPath moveToPoint:NSMakePoint(10.0, 10.0)];
[aPath lineToPoint:NSMakePoint(18.0, 110.0)];
[aPath lineToPoint:NSMakePoint(26.0, 10.0)];
[aPath setLineWidth:5.0];
[aPath setMiterLimit:15.0];
[aPath stroke];
Winding Rules
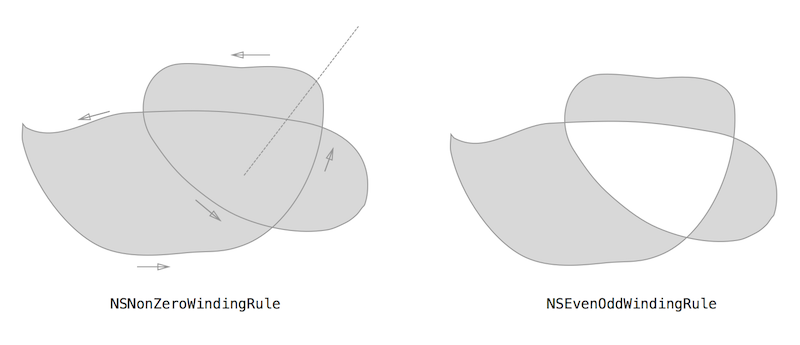
对闭合曲线路径填充时使用Winding Rules规则判断子区域是否可以填充。
某个区域事否可以填充,从区域内部找任意一点向任意方向延伸画一条射线,根据射线穿过的路径来决定该区域是否允许填充。从起点到终点完整的路径中每条曲线标注方向,从左到右或从右到左,有2种判定规则:
NSNonZeroWindingRule 非0环绕规则:射线穿过一条从左到右的路径曲线则加1,穿过一条从右到左的路径曲线则减1,最后统计的和非0则此区域可填充。否则不填充。
NSEvenOddWindingRule 奇偶环绕规则:射线穿越计数规则类似非0环绕规则,最后的值为基数则此区域可填充。否则不填充。
使用Path绘制图形
点
点是没有宽度和高度,不能单独画一个点。我们可以画一个宽度和高度为1的矩形代表一个点。
NSPoint aPoint = NSMakePoint(10.0,10.0);
NSRect aRect = NSMakeRect(aPoint.x, aPoint.y, 1.0, 1.0);
NSRectFill(aRect);
线
在Path中定义起点和终点 完成直线绘制
NSBezierPath* aPath = [NSBezierPath bezierPath];
[aPath moveToPoint:NSMakePoint(10.0, 10.0)];
[aPath lineToPoint:NSMakePoint(100.0, 10.0)];
[aPath stroke];
多边形
多个线连接起来组合成多边形
NSBezierPath* aPath = [NSBezierPath bezierPath];
[aPath moveToPoint:NSMakePoint(10.0, 10.0)];
[aPath lineToPoint:NSMakePoint(180.0, 10.0)];
[aPath lineToPoint:NSMakePoint(100.0, 60.0)];
[aPath closePath];
[aPath stroke];

矩形
矩形可以看作是多边形的特例,除了使用多条直线连接画出矩形外,Path中提供了许多方法来实现矩形绘制
1.使用NSBezierPath类实现矩形绘制,优点是速度快、精度高
1) strokeRect
绘制矩形不填充
NSPoint aPoint = NSMakePoint(10.0,10.0);
NSRect aRect = NSMakeRect(aPoint.x, aPoint.y, 40.0, 40.0);
[NSBezierPath strokeRect:aRect];
2)fillRect
绘制矩形使用默认颜色填充
NSPoint aPoint = NSMakePoint(10.0,10.0);
NSRect aRect = NSMakeRect(aPoint.x, aPoint.y, 40.0, 40.0);
[NSBezierPath fillRect:aRect];
3) bezierPathWithRect
NSBezierPath* thePath = [NSBezierPath bezierPathWithRect:aRect];
[thePath stroke];
4) appendBezierPathWithRect
NSBezierPath* thePath = [NSBezierPath bezierPath];
[thePath appendBezierPathWithRect:aRect ];
[thePath stroke];
2.使用NSRect矩形相关的系统函数绘制,优点是性能更高,缺点是精度相对低
1)NSRectFill
绘制填充矩形
NSRectFill(aRect);
2) NSFrameRect
绘制矩形bu填充
NSFrameRect(aRect);
3) NSRectFillList
同时绘制多个填充矩形
void NSRectFillList(rectList,count)
圆角矩形
在Path绘制矩形的方法上,增加圆角参数
+(NSBezierPath *)bezierPathWithRoundedRect:(NSRect)rect xRadius:(CGFloat)xRadius yRadius:(CGFloat)yRadius

-(void)appendBezierPathWithRoundedRect:(NSRect)rect xRadius:(CGFloat)xRadius yRadius:(CGFloat)yRadius
圆和椭圆
使用bezierPathWithOvalInRect:或appendBezierPathWithOvalInRect:方法来绘制椭圆
参数为NSRect定义的矩形,如果设置矩形的长宽相等则绘制为圆。否则为椭圆
NSBezierPath* thePath = [NSBezierPath bezierPathWithOvalInRect:aRect];
[thePath stroke];
NSBezierPath* thePath = [NSBezierPath bezierPath];
[thePath appendBezierPathWithOvalInRect:aRect ];
[thePath stroke];
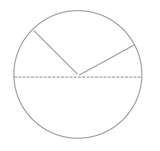
弧形
弧形有两种绘制方法
1.指定半径和弧形2个端点坐标来绘制
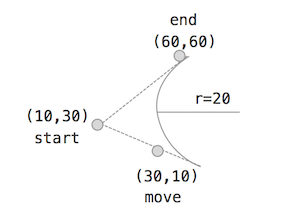
这种方法实际上需要3个点来绘制,首先需要移动到一个初始点,再指定fromPoint,toPoint和半径完成绘制。
NSBezierPath *arcPath = [NSBezierPath bezierPath];
[arcPath moveToPoint:NSMakePoint(30,10)];
[arcPath appendBezierPathWithArcFromPoint:NSMakePoint(10,30)
                                  toPoint:NSMakePoint(60,60) radius:20];
[arcPath stroke];
2.指定半径和弧形2个边跟水平线的夹角,圆可以理解为弧形的特例.
 NSBezierPath *arcPath = [NSBezierPath bezierPath];
[arcPath appendBezierPathWithArcWithCenter:NSMakePoint(60,60) radius:40
                                startAngle:45 endAngle:90];
[arcPath stroke];
贝塞尔曲线
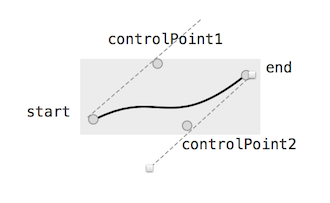
起点、终点加上2个控制点唯一确定一条贝塞尔曲线。
NSBezierPath *arcPath = [NSBezierPath bezierPath];
[arcPath moveToPoint:NSMakePoint(20.0, 20.0)];
[arcPath curveToPoint:NSMakePoint(160.0, 60.0)
        controlPoint1:NSMakePoint(80.0, 50.0)
        controlPoint2:NSMakePoint(90.0, 5.0)];
[arcPath stroke];
绘图的性能
1.最小化drawRect的绘制区域
只有第一次绘制的时候才需要整个视图区域,后续只需要对变化区域进行刷新绘制。当多个视图需要更新绘制系统自动计算互相覆盖的区域,被前面的视图遮挡的区域不需要绘制。
使用-[NSView getRectsBeingDrawn:count:]方法获取需要绘制的脏区域rect
- (void)drawRect:(NSRect)dirtyRect {

    const NSRect *rectsBeingDrawn = NULL;
    NSInteger rectsBeingDrawnCount = 0;
    NSArray *drawObjects = [self allDrawObjects];

    [self getRectsBeingDrawn:&rectsBeingDrawn count:&rectsBeingDrawnCount];

    for(id drawObject in drawObjects){
        for (NSInteger i = 0; i < rectsBeingDrawnCount; i++) {
            if (NSIntersectsRect([drawObject bounds], dirtyRect)) {
                [drawObject draw];
            }
        }
    }
}
2.不要直接使用display强制视图进行绘制更新
使用setNeedsDisplay:或setNeedsDisplayInRect:标记视图需要更新,等待视图在绘制的更新周期内自动更新。
3.对可重用的复杂的绘制使用缓存
多次使用的图片采用系统默认的缓存,这个没有什么问题。而对于复杂的绘制对象可以在内存中缓存来复用,提高系统从硬盘加载或反复创建的性能损失。
4.避免图形行下文状态的多次切换
尽量把多个相同属性设置的图形绘制做为一组统一绘制。
5.避免在绘制过程中处理网络请求、文件资源读取、视图布局 、层级增删操作