多文档应用
Cocoa文档的应用模式对各种文件资源管理提供统一的处理框架和编程模型。文档应用框架中提供了许多系统级的功能:多窗口管理,文档内容自动保存,文档版本管理,文档导入导出的编程接口。在基于文档的应用模版上可以快速开发文档类应用。
文档应用中的关键对象
1.文档控制器NSDocumentController
NSDocumentController是一个单例对象,负责文档模型NSDocument的管理,维护了系统中所有的文档模型NSDocument列表,控制多个文档窗口的激活/去激活切换,跟踪当前活动的文档对象。
2.文档模型NSDocument
做为模型保存了文档的数据,同时负责文档窗口控制器NSWindowController的创建管理。
3.文档窗口控制器NSWindowController
文档窗口NSWindow的控制器类,负责从xib中加载创建窗口,NSWindowController也可以直接控制viewController做为视图控制器。
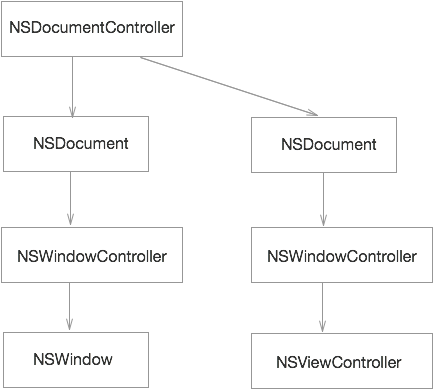
NSDocumentController
做为一只看不见的手一直默默存在。应用的文件菜单中大部分操作都要通过单例方法获取到NSDocumentController对象,使用到它的各种方法去操作文档模型对象。
1.文档对象的单例方法(每个应用中只存在唯一的实例)
+(NSDocumentController *)sharedDocumentController;
2.管理的文档列表
@property (readonly, copy) NSArray *documents;
3.当前的文档对象
@property (readonly, strong) NSDocument *currentDocument;
4.根据文档路径url获取文档对象
-(NSDocument *)documentForURL:(NSURL *)url;
5.根据window对象获取文档对象
-(NSDocument *)documentForWindow:(NSWindow *)window;
6.增加文档对象
-(void)addDocument:(NSDocument *)document;
7.删除文档对象
-(void)removeDocument:(NSDocument *)document;
8.File菜单中New对应的Action方法
-(IBAction)newDocument:(id)sender;
9.新建一个标题为Untitled的文档对象
-(NSDocument *)makeUntitledDocumentOfType:(NSString *)typeName error:(NSError **)outError;
10.File菜单中Open对应的Action方法
-(IBAction)openDocument:(nullable id)sender;
NSDocument
文档模型对象,管理文档数据,负责文档打开时数据读取管理,文档对象管理的数据保存到文件的处理。创建关联的NSWindowController负责展示文档内容,内容视图最终来响应处理用户的对文档操作的各种交互事件--(鼠标键盘操作响应,内容编辑管理)。
1.初始化指定类型的文档实例
-(instancetype)initWithType:(NSString *)typeName error:(NSError **)outError;
2.是否允许后台多线程读取文档(可以提升性能,防止文档数据量大时读取导致用户界面卡顿)
+(BOOL)canConcurrentlyReadDocumentsOfType:(NSString *)typeName;
3.初始化指定路径和类型的文档实例
-(instancetype)initWithContentsOfURL:(NSURL *)url ofType:(NSString *)typeName error:(NSError **)outError;
4.读取指定路径和类型的文档内容
-(BOOL)readFromURL:(NSURL *)url ofType:(NSString *)typeName error:(NSError **)outError;
5.读取指定fileWrapper和类型的文档内容
-(BOOL)readFromFileWrapper:(NSFileWrapper *)fileWrapper ofType:(NSString *)typeName error:(NSError **)outError;
6.读取指定Data和类型的文档内容
-(BOOL)readFromData:(NSData *)data ofType:(NSString *)typeName error:(NSError **)outError;
7.保存指定类型的文档到规定的url路径
-(BOOL)writeToURL:(NSURL *)url ofType:(NSString *)typeName error:(NSError **)outError;
8.根据文档类型返回对应的wrapper
-(NSFileWrapper *)fileWrapperOfType:(NSString *)typeName error:(NSError **)outError;
9.返回指定类型的文档数据,保存文件时使用
-(NSData *)dataOfType:(NSString *)typeName error:(NSError **)outError;
创建基于文档的工程
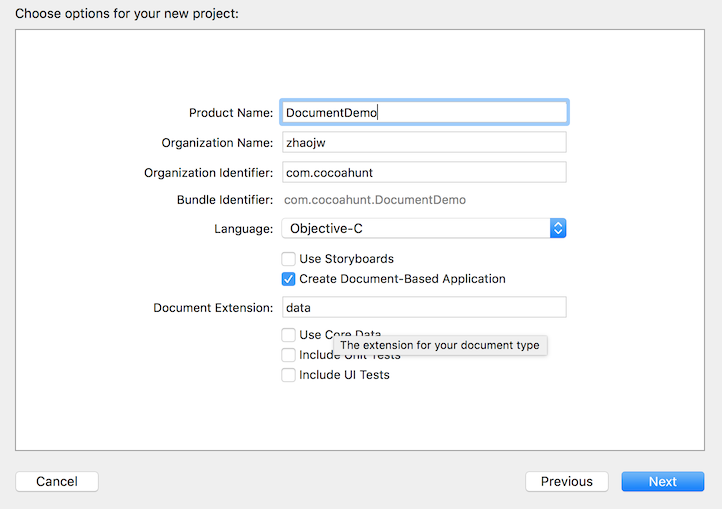
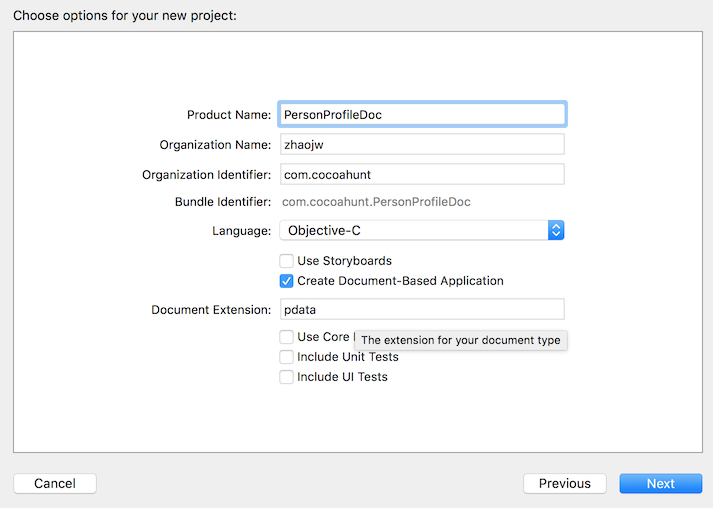
使用Xcode新建一个DocumentDemo工程,勾选Create Document-Based Application,输入Document Extension为文档文件扩展名后缀。
进入工程Target的info面板,来看看Document Types文档类型和导出时的配置。
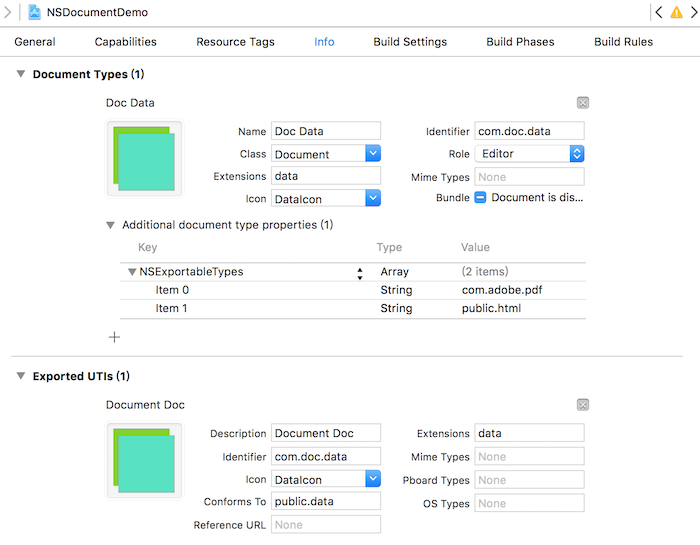
Document Types
Name: 可以为空,文档保存时显示的类型名称
Identifier:文档标识
Class: 文档类型对应的处理的类
Extensions:文件后缀扩展名data
Icon:文档类型在Finder中显示时关联的图标
Role:Editor/Viewer
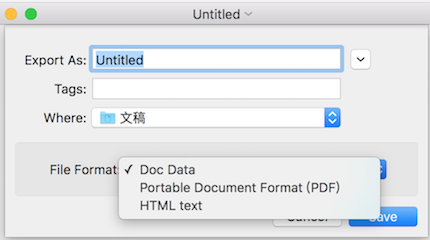
NSExportableTypes: 通过UTI定义约定的文档类型,上图例子中是com.adobe.pdf和public.html。文档导出时会出现这2种扩展名的选择。
点击Document Types部分下面的+ 按钮,可以新增文档应用支持的另外一种类型。
Document Types中定义的每一种文档类型的文件,在Finder中浏览文件,点击打开方式菜单时会出现应用的名称,表示这个应用支持打开这种类型的文档。
Document Types中定义了多种文档类型时,需要注意下第一个定义的文档类型和对应的Class为创建新文档时默认的类型和文档模型处理类。
Exported UTIs
Description:可以为空,文档保存时显示的类型名称
Extension:跟上面定义的值一致
Identifier:文档标识,跟上面定义的值一致
Icon:跟上面定义的值一致
Conforms To: public.data(UTI定义的统一文档类型)
Document Types中定义的Name 和 Exported UTIs中定义的Description 在导出文档时File Format会优先使用Name。
UTI
UTI(Uniform Type Identifiers)是Apple系统中处理文档,文件,Bundle,剪贴板数据处理时全局统一约定的类型。语法定义上类似应用的BundleID的形式(反向的域名加类型,如com.xxx.xxxdatatype)。除了公共定义的文档类型,应用可以自定义文档类型UTI。
下面是一些常见的UTI定义:
com.apple.quicktime-movie
com.mycompany.myapp.myspecialfiletype
public.html
com.apple.pict
public.jpeg
public.text
public.plain-text
public.jpeg
public.html
文档编程模版工程
从新建的Demo工程文件中看到文档工程比普通的项目工程多了Document类,我们来分析下这个类中定义的框架方法。
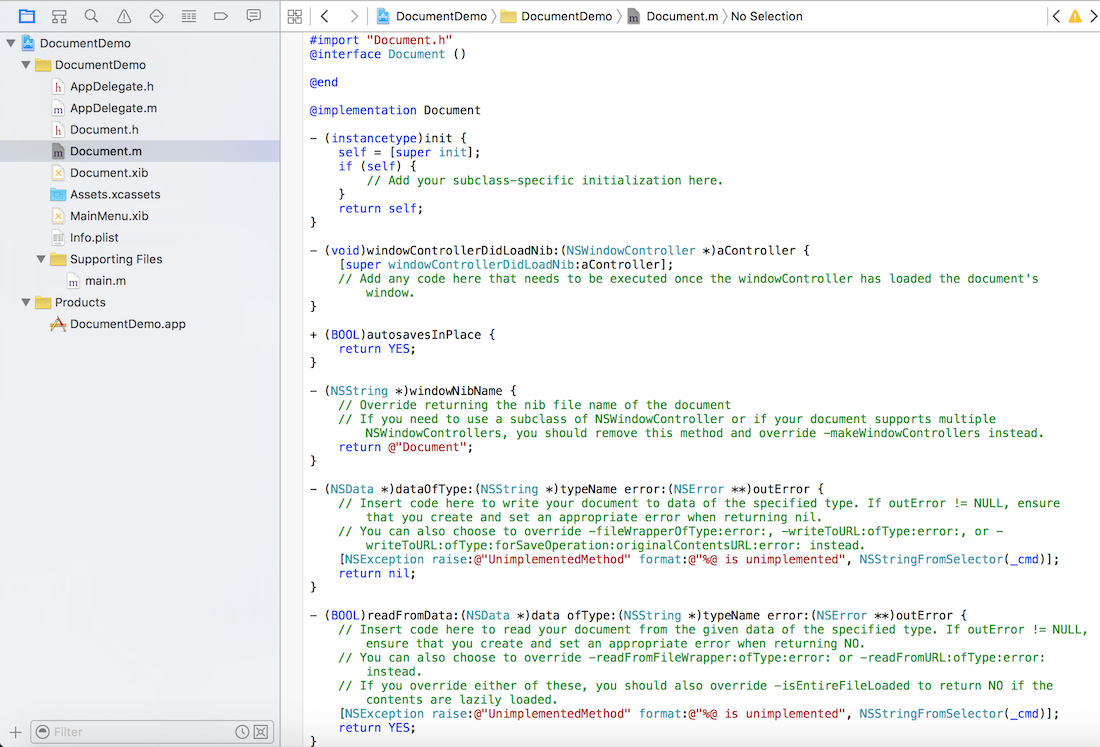
1.新建文件
运行Demo工程,从File菜单中点击New可以新建一个文档窗口,窗口界面是Document类中的windowNibName方法返回的xib文件(Document.xib)定义。
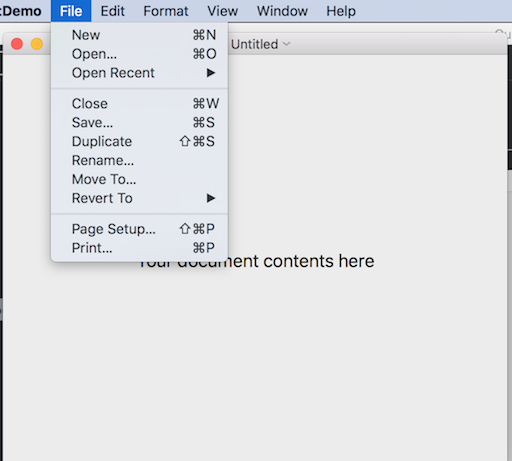
当文档创建时加载完成Document.xib文件后执行windowControllerDidLoadNib方法,可以在这个方法中实现额外的界面相关的初始化设置。
2.文件读取
从File菜单中点击Open菜单,会弹出文件选择的Panel。如果存在扩展名为.data的文件,就可以选择打开,最终会执行下面的readFromData方法,这个方法目前内部没有具体实现代码。在实际应用中,可以根据typeName参数的文件类型,对data参数做解析转化为Document模型类可以处理的数据,最后更新数据到Document关联的window界面上去。
- (BOOL)readFromData:(NSData *)data ofType:(NSString *)typeName error:(NSError **)outError {
    [NSException raise:@"UnimplementedMethod" format:@"%@ is unimplemented", NSStringFromSelector(_cmd)];
    return YES;
}
从前面介绍的NSDocument类方法中我们知道,除了readFromData读取文档方法,还可以通过下面2种方法读取。
文件路径方法读取
-(BOOL)readFromURL:(NSURL *)url ofType:(NSString *)typeName error:(NSError **)outError;
文件wrapper方式读取,我们在下面章节专门详情介绍。
-(BOOL)readFromFileWrapper:(NSFileWrapper *)fileWrapper ofType:(NSString *)typeName error:(NSError **)outError;
注意:上述3种文件读取方法在Document类中只需要实现其中一种即可。
3.文件保存
从File菜单中点击Save菜单,会执行Document中下面的方法,内部流程是根据typeName文件存储的类型,将当前文档模型中的数据转化为NSData类型返回。
- (NSData *)dataOfType:(NSString *)typeName error:(NSError **)outError {
    [NSException raise:@"UnimplementedMethod" format:@"%@ is unimplemented", NSStringFromSelector(_cmd)];
    return nil;
}
类似文件读取,还存在其他2种文件保存的方法:
将typeName类型的文件内容写入到url规定的路径
-(BOOL)writeSafelyToURL:(NSURL *)url ofType:(NSString *)typeName forSaveOperation:(NSSaveOperationType)saveOperation error:(NSError **)outError;
文件wrapper方式保存,需要实现下面2个方法(返回typeName指定的)fileWrapper类和写入文件内容到指定路径),我们在下面章节专门详情介绍。
-(NSFileWrapper *)fileWrapperOfType:(NSString *)typeName
error:(NSError **)outError;
-(BOOL)writeToURL:(NSURL *)inAbsoluteURL ofType:(NSString *)inTypeName
error:(NSError **)outError;
```
## Wrapper方式读取文件
Cocoa提供的NSFileWrapper层级嵌套管理文件资源的方法,可以支持多种文件的混合读写处理。能将文本/图片等不同的文件资源打包存储在同一个文件夹内,利用系统的文件包扩展机制将其映射为文件,从用户的角度看到只是一个文件。
下面是一个xxxx.xdata通过FileWrapper存储的文件,使用系统的右键菜单 Show Package Contents 可以看到内部有2个文件,一个文本文件一个图片。

NSFileWrapper可管理的资源分为单个文件,目录和文件链接,分别使用下面的3个属性方法来判断NSFileWrapper当前管理的资源。
@property (readonly, getter=isDirectory) BOOL directory;
@property (readonly, getter=isRegularFile) BOOL regularFile;
@property (readonly, getter=isSymbolicLink) BOOL symbolicLink;
```
NSFileWrapper相应的提供了3种创建不同类型FileWrapper的初始化方法
initDirectoryWithFileWrappers,
initRegularFileWithContents,
initSymbolicLinkWithDestination
对于目录类型的NSFileWrapper,使用addFileWrapper可以增加一个子FileWrapper;使用removeFileWrapper删除子FileWrapper;使用fileWrappers属性可以以key,value形式遍历NSFileWrapper的所有子节点;regularFileContents属性代表了fileWrappers存储的内容
-(NSString *)addFileWrapper:(NSFileWrapper *)child;
-(void)removeFileWrapper:(NSFileWrapper *)child;
@property (readonly, copy) NSDictionary *fileWrappers;
@property (readonly, copy) NSData *regularFileContents;
创建NSFileWrapper管理文件
创建一个目录型NSFileWrapper,内部包括一个文本和一个图片文件。
NSString *ImageFileName = @"Image.png";
NSString *TextFileName = @"Text.txt";
//创建一个目录类型的fileWrapper做为根节点
NSFileWrapper * documentFileWrapper = [[NSFileWrapper alloc]  initDirectoryWithFileWrappers:@{}];
读取图片内容
NSArray *imageRepresentations = [self.image representations];
NSData *imageData = [NSBitmapImageRep
                         representationOfImageRepsInArray:imageRepresentations
                         usingType:NSPNGFileType
                         properties:@{}];
    if (!imageData) {
        NSBitmapImageRep *imageRep = nil;
        @autoreleasepool {
            imageData = [self.image TIFFRepresentation];
            imageRep = [[NSBitmapImageRep alloc] initWithData:imageData];
        }
    imageData = [imageRep representationUsingType:NSPNGFileType
                                           properties:@{}];
}
创建一个存储图片内容的文件型fileWrapper
NSFileWrapper *imageFileWrapper = [[NSFileWrapper alloc]
                                       initRegularFileWithContents:imageData];
[imageFileWrapper setPreferredFilename:ImageFileName];

//增加fileWrapper到父fileWrapper
[documentFileWrapper addFileWrapper:imageFileWrapper];
创建一个文本类型的fileWrapper
NSString *str = [[self textField] stringValue];
NSData *textData = [str dataUsingEncoding:NSUTF8StringEncoding];

NSFileWrapper *textFileWrapper = [[NSFileWrapper alloc]
                                      initRegularFileWithContents:textData];
[textFileWrapper setPreferredFilename:TextFileName];

//增加fileWrapper到父fileWrapper
[documentFileWrapper addFileWrapper:textFileWrapper];
从NSFileWrapper实例读取内容
获取NSFileWrapper中所有的子节点,根据key获取不同类型的子Wrapper
NSDictionary *fileWrappers = [fileWrapper fileWrappers];
NSFileWrapper *imageFileWrapper = [fileWrappers objectForKey:ImageFileName];
if (imageFileWrapper != nil) {
        NSData *imageData = [imageFileWrapper regularFileContents];
        NSImage *image = [[NSImage alloc] initWithData:imageData];
        [self setImage:image];
}
NSFileWrapper *textFileWrapper = [fileWrappers objectForKey:TextFileName];
if (textFileWrapper != nil) {
       NSData *textData = [textFileWrapper regularFileContents];
       NSString *textString = [[NSString alloc] initWithData:textData encoding:NSUTF8StringEncoding];
       self.textString = textString;
       if(self.textString){
           self.textField.stringValue = self.textString;
    }
}
支持NSFileWrapper文件的工程配置
为了让系统支持FileWrapper创建的文件,需要在工程info.plist做文件类型UTI配置。
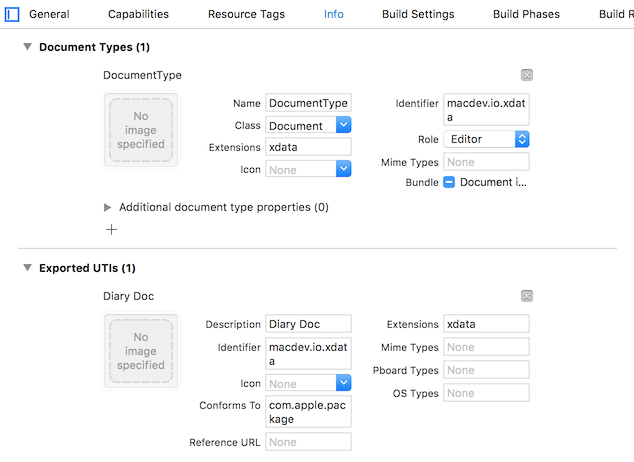
Exported UTIs 部分
Conforms To: com.apple.package
文档处理流程
系统默认的File菜单包括了文档操作几乎所有功能,除了导出功能外。
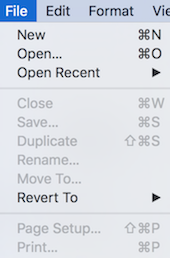
新建文档流程
用户点击菜单File->New触发新建文档流程。
1.执行NSDocumentController文档控制器的newDocument方法
1)从工程的info.plist文件中获取Document Types中配置的第一个优先使用的文档Class类。

2)创建NSDocument的子类实例document

3)执行NSDocumentController的addDocument方法,将document实例增加到管理的文件
2.NSDocumentController执行document的makeWindowControllers方法
1)根据windowNibName返回的xib文件创建NSWindowController实例windowController。

2)执行addWindowController方法将创建的windowController加入到windowControllers存储。
3.NSDocumentController执行showWindow方法
执行document的showWindows方法: 从document管理的windowControllers列表中对每个 windowController实例执行showWindow,最终显示出文档的窗口界面。
打开文档流程
用户点击菜单File->Open触发打开文档流程。
执行NSDocumentController文档控制器的openDocument方法
1)NSDocumentController执行beginOpenPanelWithCompletionHandler方法,打开一个文件选择的panel,用户选择一个文件,得到文件的URL路径

2)NSDocumentController执行openDocumentWithContentsOfURL:display:completionHandler方法

3)openDocumentWithContentsOfURL方法内部执行makeDocumentWithContentsOfURL返回文件URL配置的NSDocument类,执行NSDocument的initWithContentsOfURL:ofType:error初始化方法生成NSDocument的子类实例document
后续流程同新建文档流程流程
保存文档流程
用户点击菜单File->Save触发保存文档流程。
执行NSDocument实例的saveDocument方法
1)弹出保存文件的panel面板,使用默认的文件名或者用户输入文件名,点击保存
2)执行NSDocument的writeToURL:ofType:error方法
3)执行NSDocument的dataOfType:error 或fileWrapperOfType:error方法之一,获取文档的Data数据存储到文件中。
导出文件流程
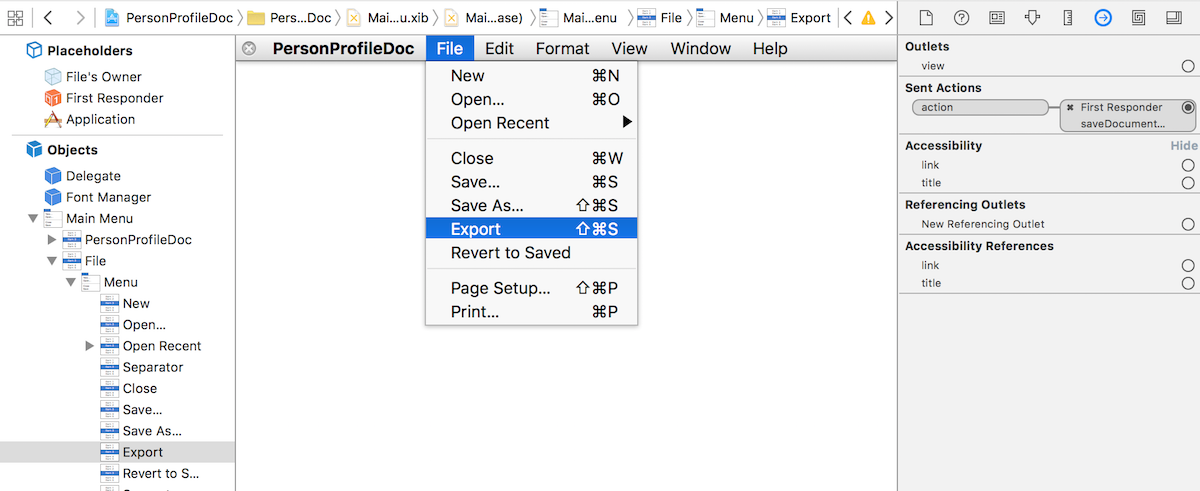
文件菜单中没有Export导出功能,需要在MainMenu.xib文件Menu中增加一个Export菜单项,action绑定action到first responder 的saveDocumentTo:方法。
用户点击菜单File->Export触发文档导出流程
执行NSDocument实例的saveDocumentTo方法
弹出文件保存面板,除了可以修改文件名外,可以选择File Format确定导出的文件格式类型。这些类型的定义参加前面章节#创建基于文档的工程#中Document Types部分定义的Exported UTIs的类型
后续流程跟保存文档流程中的完全一致。其中dataOfType:error或fileWrapperOfType:error 根据用户选择的后传入的参数类型做不同的处理。比如说需要导出为PDF格式的文件,那就在dataOfType:error方法中根据typeName判断是PDF时返回PDF格式的data数据。
文档应用开发步骤
- 新建工程,勾选Create Document-Based Application选项,输入文档保存文件的扩展名
- 参照前面创建基于文档的工程部分配置文档的info属性,确定文档类型和导出类型的参数配置
- 定制工程中生成的Document类,有2种方式
1)修改windowNibName方法返回xib文件为自定义的window界面
- (NSString *)windowNibName {
    return @"Document";
}
2)覆盖makeWindowControllers方法:创建自定义的WindowController,加入到windowControllers列表中。这里说明下对于复杂的文档应用,每个文档可以创建多个不同的NSWindowController子类,有多个窗口对应不同的文档数据。
- (void)makeWindowControllers {
    WindowController *vc =  [[WindowController alloc]init];
    [self addWindowController:vc];
}
4.实现Document类中文件内容读取和保存文件时返回文件内容data数据的方法
有2种方式,基本的数据读写方法基本的和wrapper方式管理文件的读写方法
1)基本的文件数据读写
返回当前文档模型数据存储时需要的NSData格式
-(NSData *)dataOfType:(NSString *)typeName error:(NSError **)outError;
将打开文件读取的NSData格式的数据转化为文档模型中的数据
-(BOOL)readFromData:(NSData *)data ofType:(NSString *)typeName error:(NSError **)outError;
2)基于wrapper方式文件数据读写
读取wrapper方式打包的文件内容,转化为文档模型数据
-(BOOL)readFromFileWrapper:(NSFileWrapper *)fileWrapper ofType:(NSString *)typeName error:(NSError **)outError;
根据需要存储的文档数据创建NSFileWrapper实例
-(NSFileWrapper *)fileWrapperOfType:(NSString *)typeName
error:(NSError **)outError;
文档应用中Undo/Redo支持
NSUndoManager通过提供Undo/Redo 2个不同的操作栈,记录每一步操作过程执行的方法和新旧参数实现了撤销和恢复的操作。
每个Document实例都有自己的NSUndoManager属性变量,用于Undo/Redo操作的管理。默认是支持Undo/Redo操作,如果不需要支持Undo/Redo操作可以执行下面的方法关闭Undo/Redo特性。
[self setHasUndoManager:NO];
在文档读取期间大量的初始化状态改变,是不需要存入Undo/Redo栈的,因此需要通过执行 [[self undoManager] disableUndoRegistration] 禁止Undo操作记录,等读取完成后在恢复Undo注册。
为例保证文档数据的一致性,文档的每一步影响状态的操作都需要支持Undo/Redo操作。例如在文档编辑应用中,文档文本的颜色/字体属性设置支持Undo/Redo操作,文本的删除操作不支持Undo/Redo操作的话会出现异常的场景:用户先设置完字体/颜色 记录了Undo操作,然后选择删除了所有文本,这时候用户执行Edit菜单中的Undo操作,会没有任何反应。
比如在setColor方法里面实现Undo记录
- (void)setColor:(NSColor*)color {
     [[[document undoManager] prepareWithInvocationTarget:self] setColor:self.color];
     self.color = color;
     self.textField.textColor =   self.color;
}
prepareWithInvocationTarget方法会自动拦截当前执行的方法的签名和参数构造NSInvocation对象记录对象,方法和参数,压入Undo栈。当执行Edit菜单Undo操作时从Undo栈顶取出一个NSInvocation封装的方法执行,同时setColor再次执行prepareWithInvocationTarget时把这个对象,方法和参数压入Redo栈用于Redo操作。对每个Undo操作可以执行undoManager对象的setActionName命名,这样Undo 菜单就会出现有意义的名称。
[undoManager setActionName:@Change Color
]; 这样后续执行Undo 操作,菜单会变成Undo Change Color。
Objc通过内部的对象消息转发拦截和NSInvocation方便的实现了Undo/Redo操作。我们仅仅需要在每个状态改变的方法内部执行 document对象的 prepareWithInvocationTarget 方法,传入对象,方法名和参数即可。
关于Undo操作的详细过程本书有一章详细讲述,请查阅相关细节流程。
文档应用管理个人档案
我们创建一个简单的个人信息档案管理的Demo应用,来存储个人姓名,年龄,住址,电话和头像。前面我们已经介绍过文档存储的不同方法,可以使用基本的文件数据存储和基于wrapper包文件存储的方式。下面我们依次尝试用不同的方法去管理文件的存储。
新建工程PersonProfileDoc,选中Document-Based Application 点击Next 创建完成。
个人档案数据模型
新建一个PersonProfile类,代表个人信息数据模型,PersonProfile类中采用对象的Archive机制将属性数据转换为NSData数据,同时也支持从Data数据创建对象实例。
PersonProfile.h
@interface PersonProfile : NSObject
@property(nonatomic,copy)NSString    *name;
@property(nonatomic,assign)NSInteger age;
@property(nonatomic,copy)NSString    *address;
@property(nonatomic,copy)NSString    *mobile;
@property(nonatomic,strong)NSImage   *image;
-(NSData*)docData;//Archive instance
+(instancetype)profileFromData:(NSData *)data;//instantiate class from unarchivered data
@end
PersonProfile.m
 #import "PersonProfile.h"
 #define  kPersonKey    @"PersonKey"
@implementation PersonProfile

//Decode archived data
- (id)initWithCoder:(NSCoder *)coder {
    self = [super init];
    if (self) {
        _name = [coder decodeObjectForKey:@"name"];
        _age = [coder decodeIntegerForKey:@"age"];
        _address = [coder decodeObjectForKey:@"address"];
        _mobile = [coder decodeObjectForKey:@"mobile"];
        _image = [coder decodeObjectForKey:@"image"];
    }
    return self;
}

//Encode instance properties data
- (void)encodeWithCoder:(NSCoder *)coder {
    [coder encodeObject:self.name forKey:@"name"];
    [coder encodeInteger: self.age forKey:@"age"];
    [coder encodeObject:self.address forKey:@"address"];
    [coder encodeObject:self.mobile forKey:@"mobile"];
    [coder encodeObject:self.image forKey:@"image"];
}

//instantiate class from unarchivered data
+ (instancetype)profileFromData:(NSData *)data {
    NSKeyedUnarchiver *unarchiver = [[NSKeyedUnarchiver alloc]
                                     initForReadingWithData:data];
    PersonProfile *aPerson = [unarchiver decodeObjectForKey:kPersonKey];
    return aPerson;
}

//Archive instance
- (NSData*)docData {
    NSMutableData *data = [NSMutableData data];
    NSKeyedArchiver *archiver = [[NSKeyedArchiver alloc]
                                 initForWritingWithMutableData:data];
    [archiver encodeObject:self forKey:kPersonKey];
    [archiver finishEncoding];

    return data;
}
@end
文档数据普通文件存储
1.Xcode工程target的Info中配置Documents Types 和Exported UTIs如下
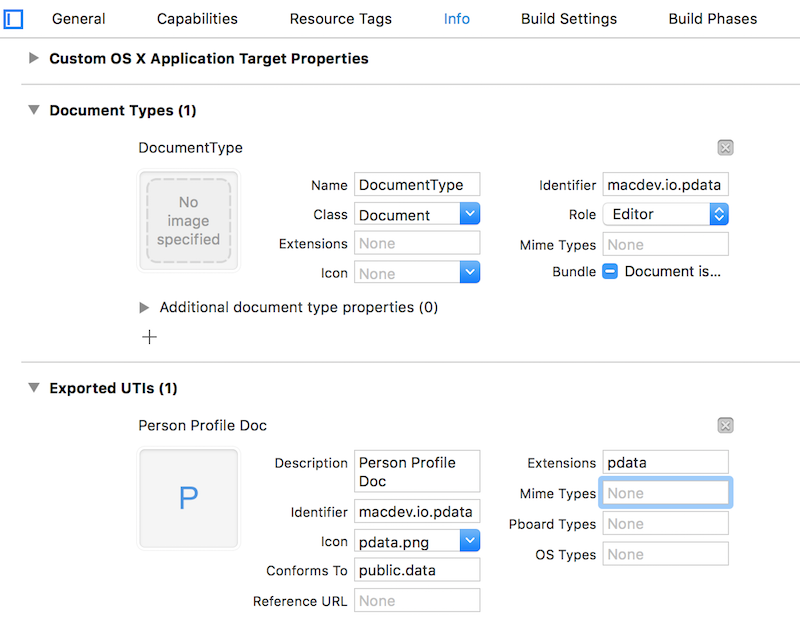
Identifier:macdev.io.pdata
Class:Document
Conformes To:public.data
Extension:pdata
icon:pdata.png
2.Document 类实现
不使用默认的Document.xib做为文档界面,因此实现了makeWindowControllers方法,采用自定义的PersonProfileWindowController实现文档UI界面控制。可以看到Document 类中对文件管理非常简单,只要实现文件读写的对应方法就可以,完整的读写流程完全由Cocoa框架控制应用可以完全不关心。
 #import "Document.h"
 #import "PersonProfile.h"
 #import "PersonProfileWindowController.h"

@interface Document ()
@property(nonatomic,strong)PersonProfile *profile;
@end
@implementation Document
- (instancetype)init {
    self = [super init];
    if (self) {
         PersonProfile *p = [[PersonProfile alloc]init];
         self.profile = p;
    }
    return self;
}

- (void)makeWindowControllers {
    PersonProfileWindowController *vc =  [[PersonProfileWindowController alloc]init];
    [self addWindowController:vc];
}

- (NSData *)dataOfType:(NSString *)typeName error:(NSError **)outError {
    return [self.profile docData];
}

- (BOOL)readFromData:(NSData *)data ofType:(NSString *)typeName error:(NSError **)outError {
    if(data) {
        self.profile = [PersonProfile profileFromData:data];
        if(self.profile){
            return YES;
        }
    }
    return NO;
}
3.PersonProfileWindowController 界面设计
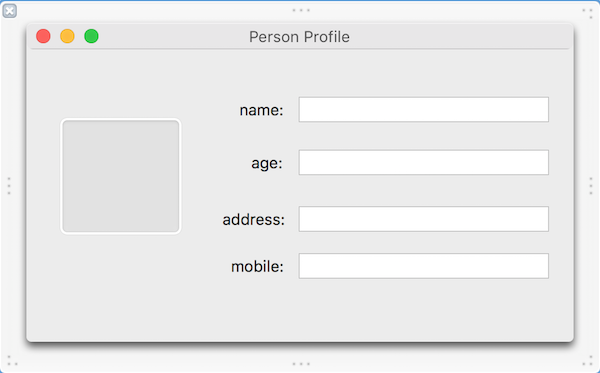
新建一个类PersonProfileWindowController继承自NSWindowController使用xib。界面拖放一个图像视图NSImageView,4个Label和4个TextField,布局如下
从控件工具箱拖放Object Controller到左边xib文件导航面板,设置它的对象绑定。
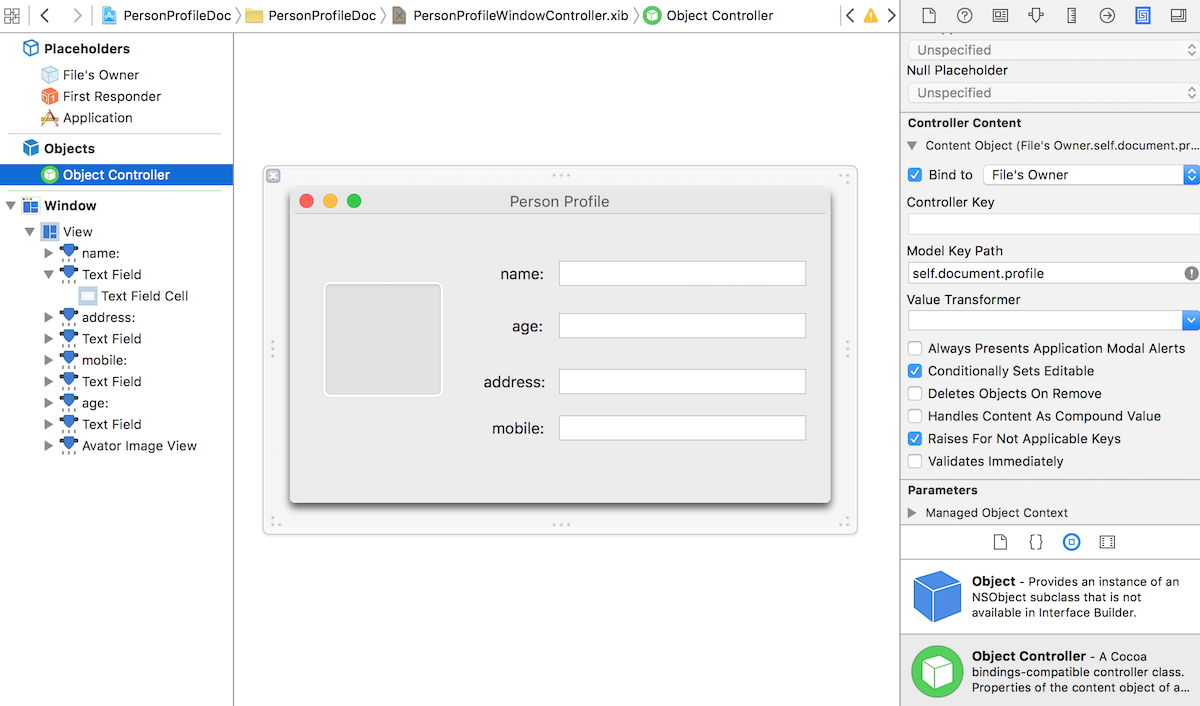
在右手边绑定面板 Controller Content部分
Bind to:File's Owner
Model Key Path:self.document.profile
Object Controller跟document.profile设置绑定关联后,我们在依次对界面中视图与Object Controller设置绑定。
依次对界面控件设置绑定,选中控件后在右手边的绑定面板Value部分 设置如下
Model Key Path分别和PersonProfile模型类的属性一一对应。
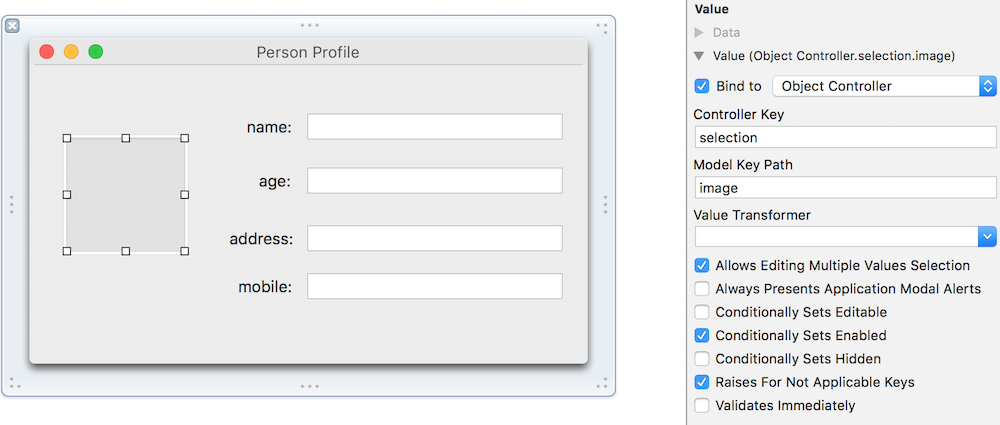
Bind to:object Controller
Controller Key:selection
Model Key Path:image
上面4个文本输入控件,用户可以输入编辑资料。对于图像视图,我们希望双击视图后能从本地Finder文件夹选择png图片做为用户的头像资料,因此需要对系统的NSImageView定制来进行事件处理。
新建一个AvatorImageView类继承NSImageView。
4.AvatorImageView 类实现双击事件响应
使用代理方式实现用户双击后的图片选择处理。代理回调方法在PersonProfileWindowController中实现。
AvatorImageView.h
#import <Cocoa/Cocoa.h>
#import <Foundation/Foundation.h>

@class AvatorImageView;
@protocol AvatorUploadDelegate <NSObject>
@optional
-(void)didRequestUploadAvator:(AvatorImageView*)imageView;
@end
@interface AvatorImageView : NSImageView
@property(weak) id<AvatorUploadDelegate>delegate;
@end

#import "AvatorImageView.h"
@implementation AvatorImageView
- (void)mouseDown:(NSEvent *)theEvent {
    if(theEvent.clickCount >= 2){
            if(self.delegate && [self.delegate respondsToSelector:@selector(didRequestUploadAvator:)]){
            [self.delegate didRequestUploadAvator:self];
        }
    }
}
@end
5.PersonProfileWindowController 类方法实现
在xib界面上选择图片视图,修改它的Custom Class为AvatorImageView,同时设置它的IBOutlet 变量为avatorImageView。
#import "PersonProfileWindowController.h"
#import "AvatorImageView.h"
@interface PersonProfileWindowController ()<AvatorUploadDelegate>
@property (weak) IBOutlet AvatorImageView *avatorImageView;
@end

@implementation PersonProfileWindowController
- (void)windowDidLoad {
    [super windowDidLoad];
    [self.window center];
    //设置代理
    self.avatorImageView.delegate = self;
}

- (NSString *)windowNibName {
    return @"PersonProfileWindowController";
}

 #pragma mark- AvatorUploadDelegate

- (void)didRequestUploadAvator:(AvatorImageView*)imageView {
    [self openSelectAvatorFilePanel];
}

- (void)openSelectAvatorFilePanel {
    NSOpenPanel *openDlg = [NSOpenPanel openPanel];
    openDlg.canChooseFiles = YES ;
    openDlg.canChooseDirectories = NO;
    openDlg.allowsMultipleSelection = NO;
    openDlg.allowedFileTypes = @[@"png",@"jpeg"];
    [openDlg beginWithCompletionHandler: ^(NSInteger result){

        if(result==NSFileHandlingPanelOKButton){
            NSArray *fileURLs = [openDlg URLs];
            for(NSURL *url in fileURLs) {
                self.avatorImageView.image = [[NSImage alloc]initWithContentsOfURL:url];

               //获取avatorImageView的绑定信息
                NSDictionary *bindInfo = [self.avatorImageView infoForBinding:@"value"];
                NSObjectController *observedObject = bindInfo[NSObservedObjectKey];
               //修改模型类的image属性
                id profile = observedObject.content;
                [profile setValue:self.avatorImageView.image forKey:@"image"];

            }
        }

    }];
}
@end
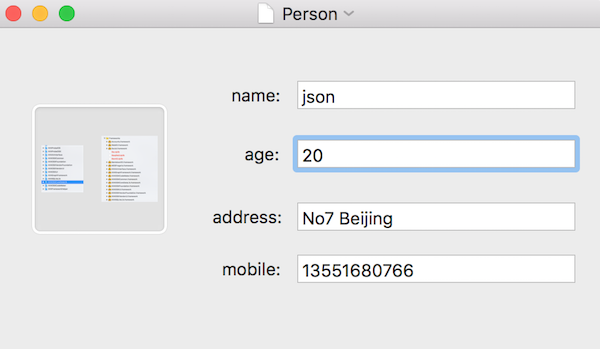
运行工程测试输入用户资料信息,双击左边的头像视图选择一个png图片,点击File菜单中的保存,输入文件名Person保存。关闭资料窗口,点击File菜单选择Open,从文件夹选择刚才的Person文件,可以看到刚才输入的资料完整无缺。
文档数据Wrapper方式存储
个人档案信息包括了图像和文本字段信息,图像存储为图片文件,文本字段信息存储为文本文件,因此也适合使用wrapper方式讲不同文件打包存储。
1.新建一个PackageDocument 文档类,引入了JSONObjKit 工具类,用来实现NSDictionary和NSString之间互相转换。
下面的实现文件中省略了init和makeWindowControllers方法,实现跟前面的Document类完全相同。
#import "PackageDocument.h"
#import "PersonProfile.h"
#import "PersonProfileWindowController.h"
#import "JSONObjKit.h"

NSString *kImageFileNameKey = @"Image.png";
NSString *kTextFileNameKey = @"Text.txt";

@interface PackageDocument ()
@property(nonatomic,strong)PersonProfile *profile;
@property (strong) NSFileWrapper *documentFileWrapper;
@end

@implementation PackageDocument
 #pragma mark-- FileWrapper

- (BOOL)readFromFileWrapper:(NSFileWrapper *)fileWrapper
                     ofType:(NSString *)typeName
                      error:(NSError **)outError {
    NSDictionary *fileWrappers = [fileWrapper fileWrappers];
    NSFileWrapper *imageFileWrapper = [fileWrappers objectForKey:kImageFileNameKey];
    if (imageFileWrapper != nil) {
        NSData *imageData = [imageFileWrapper regularFileContents];
        NSImage *image = [[NSImage alloc] initWithData:imageData];
        [self.profile setImage:image];
    }
    NSFileWrapper *textFileWrapper = [fileWrappers objectForKey:kTextFileNameKey];
    if (textFileWrapper != nil) {
        NSData *textData = [textFileWrapper regularFileContents];

        NSString *textString = [[NSString alloc] initWithData:textData encoding:NSUTF8StringEncoding];
        NSDictionary *profileTextDic = [textString xx_objectFromJSONString];
        [self.profile setValuesForKeysWithDictionary:profileTextDic];
    }
    self.documentFileWrapper = fileWrapper;
    return YES;

}

- (NSFileWrapper *)fileWrapperOfType:(NSString *)typeName
                               error:(NSError **)outError {
    if (!self.documentFileWrapper) {
        NSFileWrapper * documentFileWrapper = [[NSFileWrapper alloc]initDirectoryWithFileWrappers:@{}];
        self.documentFileWrapper = documentFileWrapper;
    }

    NSDictionary *fileWrappers = self.documentFileWrapper.fileWrappers;
    NSImage *image = self.profile.image;
    if (![fileWrappers objectForKey:kImageFileNameKey] &&  image) {
        NSArray *imageRepresentations = [image representations];
        NSData *imageData = [NSBitmapImageRep
                             representationOfImageRepsInArray:imageRepresentations
                             usingType:NSPNGFileType
                             properties:@{}];
        if (!imageData) {
            NSBitmapImageRep *imageRep = nil;
            @autoreleasepool {
                imageData = [image TIFFRepresentation];
                imageRep = [[NSBitmapImageRep alloc] initWithData:imageData];
            }
            imageData = [imageRep representationUsingType:NSPNGFileType
                                               properties:@{}];
        }
        NSFileWrapper *imageFileWrapper = [[NSFileWrapper alloc]
                                           initRegularFileWithContents:imageData];
        [imageFileWrapper setPreferredFilename:kImageFileNameKey];
        [self.documentFileWrapper addFileWrapper:imageFileWrapper];
    }
    if (![fileWrappers objectForKey:kTextFileNameKey]) {
        NSMutableDictionary *profileTextDic = [NSMutableDictionary dictionary];
        if(self.profile.name){
            [profileTextDic setObject:self.profile.name forKey:@"name"];
        }
        if(self.profile.age){
            [profileTextDic setObject:@(self.profile.age) forKey:@"age"];
        }
        if(self.profile.address){
            [profileTextDic setObject:self.profile.address forKey:@"address"];
        }
        if(self.profile.mobile){
            [profileTextDic setObject:self.profile.mobile  forKey:@"mobile"];
        }

        NSString *str = [profileTextDic xx_JSONString];
        NSData *textData = [str
                            dataUsingEncoding:NSUTF8StringEncoding];
        NSFileWrapper *textFileWrapper = [[NSFileWrapper alloc]
                                          initRegularFileWithContents:textData];

        [textFileWrapper setPreferredFilename:kTextFileNameKey];
        [self.documentFileWrapper addFileWrapper:textFileWrapper];
    }
    return self.documentFileWrapper;
}
@end
2.配置Package 文档类型,支持Wrapper方式读取
在Xcode Target的Info里面Documents Types 部分 点击底部的+,增加一种新的文档类型。
Exported UTIs 点击下面的+,增加一种类型。
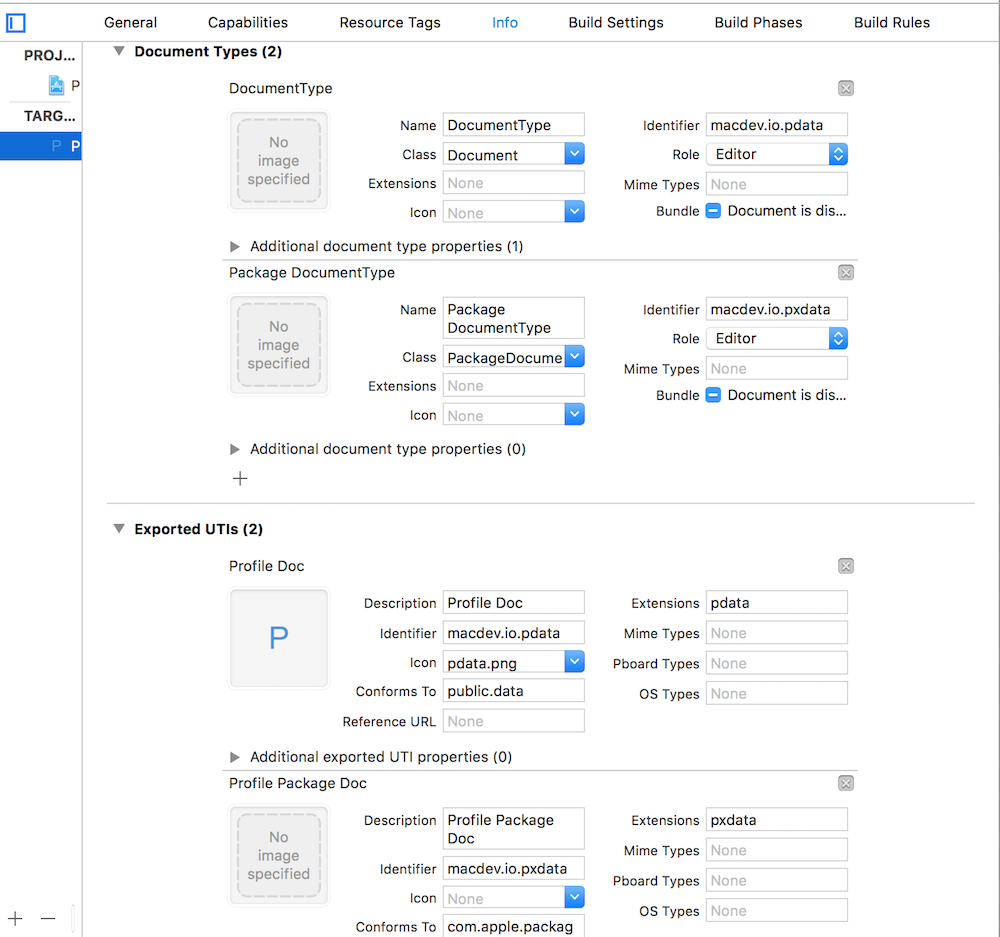
Identifier:macdev.io.pxdata
Class:PackageDocument
Conformes To:com.apple.package
Extension:pxdata
3.增加导出菜单
工程的MainMenu.xib中 在Main Menu中找到File菜单,增加Export导出菜单。action 绑定事件为First Responser中的saveDocumentTo:
4.配置主文档的导出类型
对Documents Types中的第一个文档类型增加导出类型
点击Additional document type properties
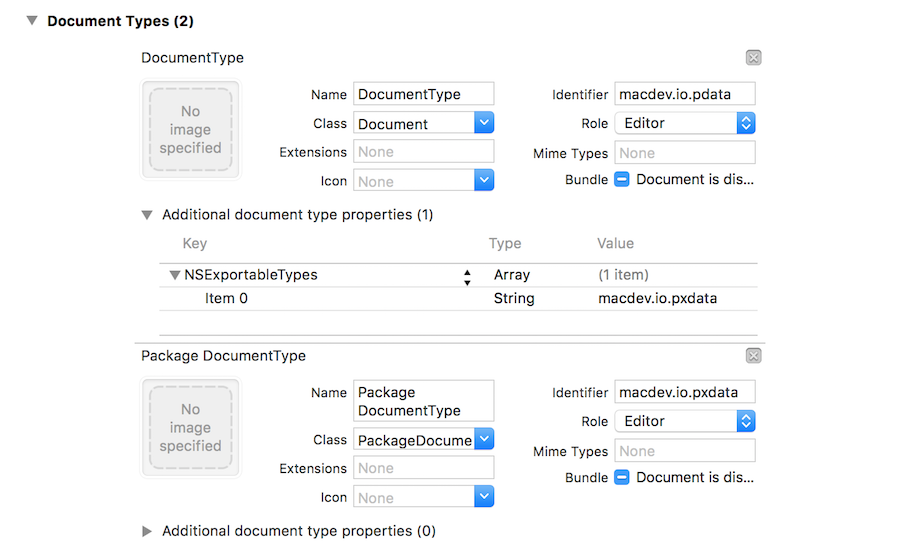
增加NSExportableTypes 数组节点,内容为 Wrapper 文档类型的 Identifier:macdev.io.pxdata.
这里可以增加多个UTI文件类型。
修改Document.m的实现writeToURL方法如下:
- (BOOL)writeToURL:(NSURL *)url ofType:(NSString *)typeName error:(NSError **)outError{
    if([typeName isEqualToString:@"macdev.io.pdata"]){
        return [super writeToURL:url ofType:typeName error:outError];
    }
    if([typeName isEqualToString:@"macdev.io.pxdata"]){
        PackageDocument *pdoc = [[PackageDocument alloc]init];
        [pdoc setValue:self.profile forKey:@"profile"];
        return  [pdoc writeToURL:url ofType:typeName error:outError];
    }
    return YES;
}
writeToURL方法内部根据文件typeName判断如果是macdev.io.pdata 基本类型,使用超类super的默认方法writeToURL存储;如果是macdev.io.pxdata类型则使用新的PackageDocument去存储。
这样对于创建的文档,点击Export菜单,会在文件选择对话框底部出现file format 格式选择框
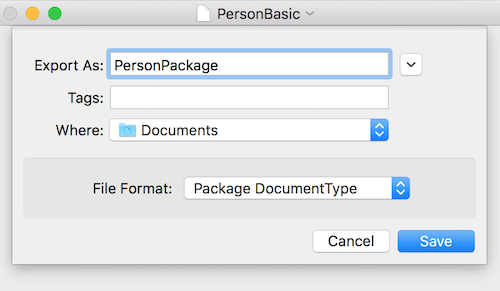
选择Package Documentype 就将文件使用wrapper的方式存储为package包的格式。
在Finder中找到PersonPackge文件,右击菜单Show Package Contents(显示包内容) 可以看到内部有2个文件Text.txt和Image.png。